There is a tradition for holidays to give each other gifts. Someone will run to the store and buy a lot of useless baubles. But we are with you for sure that, firstly, we can make anything yourself, and secondly, a gift should be not only beautiful, but also practical so that after the holiday it is not dusting on the shelf. To 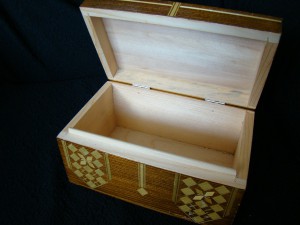 there will be something to do in the daily detention of the evening.
I propose as a gift to make such a wonderful casket. Its form can be the most different, but, as an example, I propose to make a small box with a lid square shape. It has its own specific features in its manufacture, one of which is that it is going entirely - the case with a lid and the bottom. I propose to make it with sizes 150x80x60 mm: Cover -10x80x150 mm, bottom - plywood 12x80x150 mm, sidewall - 10x50x150 mm, end sidewall - 10x50x70 mm.
Belt the box
At first, I cut four rectangular blanks made of planed wooden tables with small teeth with small teeth - two long and two short, with the same width and the same thickness (10 mm). It is advisable for this to take the liquip, as it is well processing, it is easily joined by the plane and is drawn up with sandpaper.
Up to the assembly of the box in long sidewalls, the sinuses are cut out for spikes, and in short end sidewalls - spikes in size of sinuses 4 × 4 mm. Making a fitting of the gap and spikes, we collect the box: the ends of the short sides are lubricated with joinery glue and fit in the grooves of long sides, which are also lubricated with glue. It is possible to cross these parties by compressing clamps or with the help of specially made wooden sticks - aging. At the time of gluing, it is necessary to work quickly and check the carbon correctness of the location of the details.
The baked casket caskets must dry before harvesting the glue. Usually enough for this day.
Bottom and lid.
In the island of the product taken out of the clamp-clamp, it is necessary to align the edges to which the donyshko will be glued and touch the lid. To do this, it is necessary on a flat plane to fix the sheet of sandpaper and put the edges on it with some effort.
Then the bottom is preparing from plywood and a lid of skimming. Rodyshko and the lid must be rectangular, in size slightly more than the magnitude of the glued box. Prepared cover and bottom I stick on the walls of the box at a preheated glue (on a water bath): I lubricate the cover with a thin layer, the bottom of the box and the edges of the box, I impose the cover and the bottom on the edges of the box and clamp the clamp. Pay attention: During this process, follow the cover or bottom to move into any side!
To dry the glue in the box I put it on the shelf. In the clamping condition, the box is holding around about a day, then remove the clamp, inspecting the edge of the edge and the bottom of the planing with the plane, and then cleaner with sandpaper. On the perimeter of the lid, I remove the placked chamchair on a 14 mm wide and a slope of 5 mm. Next, with the help of a flight, I make a line at a distance of 20 mm from the top for the cut of the lid. Upon separation line, you need carefully fine-skinned hacksaw (you can saw a casket along all four sides. This technique allows you to perfectly adjust the size of the lid to the size of the base box. Separal places need to be laid on a sheet of large sandpaper.
Write a loop
I make a lid on the loop with the insert and fastening loops with screws. You can not always find a loop of small sizes and various shapes. If there are no necessary loops, they should be made from metal or wood. Metal loops can be single-layer and two-layer. I make two-layer loops, the process of their manufacture is easier. The strip of metal bend in half, insert the carnations into the place of bend and cut the metal in the vice around it. In the same way we make a second half of the loop. Then placing the loop in length into three parts. One of the sides stepping a two extreme parts, leaving the middle, in the other, on the contrary, - weeping the middle, leaving curls around the edges. Swirling parts of both halves of hinges we combine and insert into the nail or wire, crawling on both sides
Nadfil. The loops cut both sides and drill holes with their subsequent zenkovka under the head of the screws.
Straw finish
With the help of a soft cloth, I make a tampon, waging it with a mourn and cover the casket, after which I put on a dryer for 3-4 hours. After drying, I paste the shallow emery paper so that there is no pile left. Before transferring the pattern, the wooden base is evenly wiping with glue solution. The glue is used the same that will be subsequently attached to straw appliqués. This technique creates a soil layer, on which the parts of the straw set are firmly fixed.
In 2005, not far from our cottages on one field was sown rye, and on the other - wheat. Taking a garden secateur with them, I went to these fields and cut the rye and wheat straw. They differ well: wheat straw lighter, and the rye is darker. In the rye straw, the knots are longer, and the wheat is shorter, like straws. I cut straw from the knot to the knot and fold them into a cardboard box, rye separately from wheat. Next, put the straw into a small enameled saucepan and pour boiling water for 30 minutes, after which the straw on one side cuts and immediately smoothed the hot iron on the cardboard: first from the inside, and then with the external one. By the way, when you hold the iron longer in straw, it turns out darker. Unlocked straw ribbons I take the width and lay out in different boxes.
Strips made of straws are easy to cut into a knife, sharpened on a slanting width of 1 mm or 1.5 mm depending on the pattern. Also cut the squares, rhombic. Mugs can carve a tube tube. This work is quite complicated, almost jewelry. All cut parts lay out in matchboxes.
Start appliqué
Figure Plan in advance, everything depends on your imagination. Apply the image in this way:
• on a piece of cardboard pour a few drops of glue;
• pointed nail or seer put the straw metal and its lower plane touch the glue droplets;
• Detail is transferred to the appropriate place, and to remove it from the tower is slightly pressing the pointed stick, which is kept in the other hand;
• I turn the wand and press the part to the base flat.
Then the other item is superimposed and lined. And this is how the entire composition of the drawing is gradually filled. Finished with one side of the box - go to the next. The gluing of the walls of the straw is usually starting with the installation of internal or external image contours, then the following figures are pasted and so on. Until all the composition planes are filled.
And if the walls of the casket are decorated, the gluing of the walls of straws should be started from the laying of external perimeters, and then you already put the configuration of the elements in advance.
The coating of the lacquer is made using a wide soft squirrel brush. The product dries, and then, where you need, in some places it grinds. Just get involved in varnishes. Do not: excessive shine is not a sign of a well-made thing!
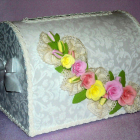
Casket is ready! If you are all done correctly and neatly, it can be decorated with a buffet or chest and keep in yourself a lot of expensive heart of things.
On a note:
A house from a tree - what could be better. You enter him and directly physically feel connections with nature. And this unique smell of wooden houses! Just a forest fairy tale. Recently, people have become greater ordering wooden houses, rather than houses from stone, brick, foam block, etc. and no wonder. After all, the house of wood is environmentally friendly, reliable and natural. In the house of the tree just want to live.




 Start a discussion ...