Since ancient times, people believed a stork by a magic bird, which brings love, happiness and wealth to the house. Storks can live next to a person, but completely tame this bird will not work. If you want, as in the old days, attract storks to your dwelling to protect it from the troubles, bring happiness, love and harmony to the house, you can attract these birds and build a stork nest.
Storks are symbols of family well-being and the continuation of the kind. If you know that storks live nearby, try to attract these birds and make a nest for them.
But before doing this responsible business, we will learn folk signs related to these beautiful birds:
- if Storks flew to your home and settled nearby, do not drive the birds, they will bring you and your native wealth and happiness;
- sterlets, so in antiquity they called storks, protect the dwelling from the evil eye and fire;
- it was believed that if the bird suddenly left his nest, then trouble could be in the family or with a housing;
- if the stork began to fly over your home often, then soon in your family will be replenished;
- if the stork sat down to relax on the roof or pipe of the house where the wedding is celebrated, then soon in the young family will be replenished.

Preparatory work
One desire So that storks settled nearby with the house, it is not enough, it is necessary to reserve a nest for birds, observing such rules:
- the distance from your home to the nearest pasture (it may be a farm, meadow or swamp) must be no more than 2 km. Aistam needs food and the ability to hunt;
- if there are already birds not far from your home or cottage, the probability of settlement becomes more;
- a new nest can be built at a distance of 300 m from the nearest stork nesting. This rule is obliged to ensure that the birds do not quarrel and unified territory;
- make a nest for Aist with their own hands you need in the first spring months or in the fall, when the storks have not yet arrived and did not have time to find a place of habitat;
- take care of a convenient location of the birds - away from electrical wires and so that the storks it is convenient to land. It can be a pillar, a roof of a house or a housekeeping, a tree;
- the height of the nest is from 4 to 10 m. Try to immediately make a solid support for the nesting, so that it can withstand the weight of adult birds with brood and the nest itself, and this is about 40 kg;
- please note that every year the birds will add new elements to the nest, so it will become harder;
- as a base for bird nest, old wheels will serve from a bike or carts, harrow or specially built sumps from a girlfriend (metal rods, strong branches, boards);
- so that the branches are not crumbled, the nest must be fixed from the outside by planets by pegs or long nails.
Make the basis for the nest is only part of the task, because storks - birds careful, they will be better equipped in the old nest than settling in the new. Therefore, you need to try to make the nest to be built on all the rules: Put dry branches on the bottom, it will be the basis or "pillow", the thickness of the thin branch layer - not more than 30 cm. In the middle, you can put a layer of straw and manure (you can cow or horse). To strengthen the base of the nest, prepare a twig. Remember that in no case you can not fasten the branches to the birds so that the birds are not injected. And one more trick - the edges of the bird nest must be sprinkled with lime (imitation of bird litter) so that it looks like an old one.
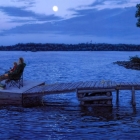
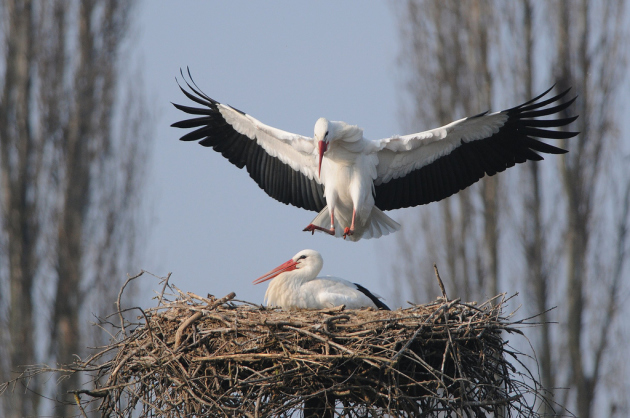
Aist's nest. Photo:


How to make a stork nest
One of the fastest options is a fit of the storks on the tree. It can be the top of an adult tree. Install the nest can be based on or on any thick lateral branch.
We begin to build a nest, first of all prepare the platform: doomed all the branches that interfere with the birds take care of the nest. As mentioned earlier, the base for the nesting storks can be made from the finished peel, the old wheel, filmed from the cart or knock the solid base from the wooden boards. You can do and any healthy materials, only that they be strong, since the nest must withstand a lot of weight, about 30 kg and even more.
If you see that the tip of the tree is split, then the extra branches must be cut off to make a convenient place to fasten the platform. Throw branches, they can be attached to the remaining bitch. You must have a base or frame, you can kill branches or boards, which will serve as a support for the future bird nest.
Look at this image, you can build an artificial nest for storks to firmly fix the base on the top of the tree:

Making the nest on the post
Many owners who strongly wanted to have storks settled on the roof of their homes or housekeeping, began to think about moving the birds at a safe distance. The fact is that storks are large birds, 3-4 times more than pigeons. Imagine how many problems can they deliver you if you settle them on the roof of a residential building? It is quite problematic to wash the windows, roof and approach to home from bird litter. Therefore, about the place to install the nest you need to take care in advance. An excellent option is to install the socket on a concrete or metal pillar, by the way, a strong wooden pillar is suitable, located near the house, the main thing is that the tree is not old and rot. An important point - setting the stork socket is allowed only to the columns without existing electrical conductors.
How to make a stork nest with your own hands:
- First you need to thoroughly strengthen the post, even if he stood in the ground for many years. This is necessary so that the support withstand the weight of adult birds with brood and the weight of the nest itself. It is also important to strengthen the pillar so that the nest does not fall and the support confronted strong winds.
- To lure birds to the supports of the current electrical lines can not, as storks are often dying, clinging to the wings and landing on the wires.
- Discove the post in the ground, and the nesting itself needs to be knit straight to the post (if it is wooden), if the support is concrete, then you need to fight the design in several places so that the jack is securely held.
- The skeleton for the nest is best to build from the finished fence (section 20 by 40 mm), then you will handle the task of 2 times faster, and the frame itself will look careful.
- Collect the frame will have to be in place, that is, on the top of the pillar. For fastening, you need to buy screws on wood, hacksaw and screwdriver.
- Clamp Made from metal soft rim, suitable aluminum (width 15 mm). IMPORTANT When attaching a clamp, leave a small gap so that it turns well around the tower.
- After all the details are fixed, the frame for the socket is ready. Next, you can leave everything as it is, storks will independently complete the nest. If you want to do everything to the end, then you need to attach a nest to a bolt clamp. The wire is better not to use so that the birds are not hurt.
Methods for fastening the base on a wooden or concrete pillar:

Roof nest
Regardless of which roof you need to install the nest, it is best to foresee and build a wooden lining. To do this, you will need 2 vessels from the tree (length 1 m 30 cm). The bars need to put it custody so that you have a long end (length 1 m) and shorter (30 cm length). We make 2 crossbars and connect their boards (distance 1 m). You will have 2 goats. They need to be fastened on the roof.
To short ends at the top, we attach the platform (we build out of the tree). The wheel will fit the wheel, or the hand-made grill made of slats.

Look at the image to understand how to properly fasten the base for the nest on the roof of the house.
How to heat the nest for a stork
The bird may have the right to choose - to get a new nest or choose an old and verified. So that the storks flew to your nest, try to find in the forest or on the plain (storks prefer wetlands to have the opportunity to hunt frogs and snakes) Old bird's nest. It will be the basis for which then you can fasten the trust.

For the construction of a stork nest for storks, you will need such a material:
- khpatsa Twig - 3-4 pcs. In order to make the nest, it is suitable for scroll rods, straw, grape vine or stalks of the root. The material must be flexible. You can prepare the bars yourself or buy a few mating in the store;
- the branches must be bend into semir and combine together to get the ring. The ends of the rod can be connected by the twine. If the branches are raw, then this material is very difficult to blame the nest. First you need to dry the rods, leave the knit on the street so that it dries. If it rains or in the street is increased humidity, then the mating is better to hold in a dry and warm room;
- besides the branches, cook another straw. It must be put in the middle of the nest, on top on the layer of branches;
- dry manure (you can take a cow or horse) - lay the layers between thin branches;
- white lime to make a bird's imitation - you need to miss the outer side of the nest with a thick lime solution. No chemicals use the nesting nesting unit.

How to attract storks to a new nest
You can help birds in different ways: feed, protect and build sockets. Earlier it was believed that storks should have nests on their own, as it is very difficult to attract the feathered to a new housing. If you have prepared a nest for storks, you still need to periodically serve it and check from time to time.
Check sockets:
- check the branches on the tree under the jack. If they started to deteriorate, it is better to cut a fragile base and rearrange the nest to a stronger platform;
- it happens that such that the nest of a point in all the rules, the platform is durable and stable, and storks are in no hurry to settle in a new nest. Perhaps the green sprouts began to break through. They need to cut to try to attract storks again.

Remember that it is not enough to do a nest, you need to wait until storks look at the nest and decide to settle in it. It leaves for several years. Do not worry if you are all done correctly, and the birds have not yet arrived, you need to be patient and wait.
Look, how does the stork nest: