
Recently, the bas-relief technique on the walls became so popular that I decided to try myself as an artist on plates and make a bas-relief in the children's room, especially since the repair of my babies has long been time to do. I just fascinated me, as if growing trees from the walls from the gypsum, so there was no problems with the choice of the theme of the drawing. It was decided to make a tree, and on the tree a couple of birds. So my master class on the bas-relief I present to your attention.


To start the wall, I lined with plaster plaster, lured to an ideally even state. The primer did not take place - it decided to rejuvenate before painting the finished bas-relief. I wanted to create such a tree so that his bark, twigs, the leaves were as much as possible to real, so I used a thick, well-bent wire and gauze (bandage) as a frame. At first, the wire bent in such a position in which the trunk of a tree will look, then the hands of a slightly believed induced, very thick plaster (I added a droplet of a brown koller) and all this was kept bandage. It turned out a curved gauze sausage.

By the way, I added a kel in the plaster in front of the manufacture of a tree trunk so that the bas-relief on the wall turned out to be the most natural possible. The leaves were going to sculpt from ordinary white plaster, and a keler added to the gypsum for the trunk. In the future, when the entire bas-relief is covered with paint, and the leaves and branches will sway and the difference in the shades of foliage and the bark will be noticeably fine.


Further in the place where the tree trunk will be located on the wall, drilled three holes, drowned a dowel and screwed the workpiece on the wall on the tapping screw. It is necessary to attach that it is a wet blank, since when it dries, it is very problematic to strengthen on the wall, and you can turn the wet workpiece as it is necessary and tightened. Just if when the wire is screwed, it was not as it was, it can immediately be inhabited. In general, after fastening the workpiece on it, the plaster plaster was brought to it and with the help of a spatula, a teaspoon and a thin nozzle drew a notch on the crust, slept on the branch. It turned out so natural that he did not expect. It inspired me, and the work further flowed faster!


On the corner of the walls assumed a bird that will sit on the branch and take off. Therefore, made from the wire the second framework frame, again the plaster washed and wounded the bit, attached the same way (self-tapping). Again, over the entire surface of the workpiece applied plaster and shaped the bas-relief of the tree trunk, which drowned into the wall. More subtle branches I have already drawn right on the wall by plaster, helping myself with a spoon, a spatula and a knife, removing everything too much.

When the central barrel with branches was ready, painted a pencil on the wall of the leaved, leveled their edges with a knife and a spatula, surplus gypsum removed. The tree on the wall turned out to be very different, but then the task was to stand for me: how to cut birds from the gypsum. And not just sitting on the branch, but with open wings gathering as it would takele. It was decided for the manufacture of Bird Birds to use small pieces of thin mesh for wings and again wire and bint for the body of a bird.


At first, the bird's body has formed when the blank dried slightly, attached pieces of mesh on the gypsum on the sides. During the day, the bird slowed down, and then I put it gently on the branch of the bas-relief. The wings attached to the wall on the tapping screw, and so that she did not settle under her weight until he was dry, a roulette lay under his stomach.


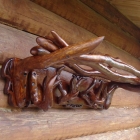
After complete drying of the gypsum, I began to form the legs and other parts of her body. When it created a head, beak and other small pieces of bas-relief, used for better work and accuracy ordinary painting tassel. She applied plaster, she smoothed, wetting in water. The finished bird lied to the smoothness by the sandpaper Zero - and Voila! Bird, opened the wings and as it were, I was going to fly out, only the wall keeps her for the wings. Sorry, in the photo of the manufacturer of the bird on the camera lens came the plaster, so the pictures are slightly darkened. According to the same principle, I made a second bird with the only difference that the second bird just sat on a branch without twisted wings.


Then he followed monotonous work on the grout of the sandpaper of all unnecessary gypsum smears, removing unnecessary elements and wiring light to the bas-relief. But ultimately it turned out in the completed gypsum version here is such a bas-relief with your own hands. Next, my husband and I are going to hide the batteries for plasterboard and keep painting with bas-relief walls. But this is already in another article. And the first stage of the painting of the bas-relief on the walls is over. I hope my loyal lesson you liked.
The final version of the bas-relief after painting can be viewed on my new site http://kobzewa.ru/barelef-derevo-i-pticy.html. There are works not only in the style of bas-relief, but also the original design of the premises with plaster stones, plaster moldings and much more. Come in.


Umnichka !! Quite interesting work!
Thanks! The work is not yet completed. Now I am engaged in the bottom of the walls. But after full painting of the bas-relief lay out the photo of the final result.
How cool !!! So neat and very original.
Fabulous!!!!! Very available. How can I see your following lessons? Dreamed about this! And your lesson inspired me to try something like that.
The beauty!!!!!
Lika, after I published my master class, the acquaintances began to come and watch, some wanted themselves something like that. In general, work has become so much that time is practically not left for your home. Now I make a website on which I will lay out all your work. And I painted the birds on the branch. Reference publish a little later.
Tell me please, but for the plowing of birds you can use a bow? I want to make big birds, work with a plaster is not very comfortable very quickly dries.
Yes, Polina, you can and putty, only it dries about a day.
I really liked it, I also inspired to make a bas-relief in the form of the arch above the door of the colors. made the finished gypsum finish putty on the wall, but when drying, the leaves of the colors began to be brought. Create that you need to do the leaves not to be brought, than to cover the wall. You can cover the wall with something so that the leaves do not appear.
Svetlana, I add in such cases when creating a bas-relief, when mixing the solution, the primer of deep penetration and nano wall before starting work. Adhesive compositions do not use. Since when mixing them with a putty, the solution will then dry for a very long time, which is not very convenient.
Perfectly! You are well done. Very guilty for the room. Please tell me with whom you need to cooperate in order to enlarge it.
"Who needs to cooperate to earn it?" - with people -)
Nishtyak, I also have gold hands, only grow not from there
The lesson and work surpassed all the expectations. How easily accessible everything is outlined. Thank you. This is a big creative idea. But what is characteristic of for some reason women show. And where are our men.
and you can still look anywhere else? I really liked me :-)
See here - http://kobzewa.ru/
Very nice, I also really want to learn.
Hello! You got insanely beautifully, I want to create something similar in the hallway.
Tell me, please, you wrote that before the work of the wall was leveled by plaster and lost them to the perfect state. And it is possible to make them a little embossed? Or all this beauty will be worse how to hold on and go to bed?
And if possible, what material is more convenient to work to create a light relief?
Thanks in advance for the answer!
If you want to create a bas-relief in the form of a tree, then the smooth wall winning emphasizes all the reliefs of the modeling, but small embossed areas on the wall (for example, Venetian plaster) just look great. As a solution for modeling, I use gypsum putty.
I went to your new site and stood !!! What beautiful works are Natasha !!! Yes, diligence and fiction you do not take !!! Casket, city and geisha were very struck !!! Such a complex and fine work you are well done. I will continue to follow your work !!! I wish you success!!!