At the moment, even a small building requires a reliable foundation. It advocates the key to the strength of the structure and its durability. But when building a house or other similar construction, the same question arises: what is the foundation best to use and what technology should it be poured? The answer lies in a number of factors: the number of floors in the building, its area, weight, soil features and much more. But in the overwhelming majority of cases, the optimal option is a solid foundation. On how to make all the work on his fill on their own, we will talk below.
When is needed solid foundation?
The most demanded solid monolithic foundation in unstable soils - they have a weak bearing capacity. It is also perfect in places where water is close to the surface. It is also indispensable on construction in old landfills, in sandy location and where the soil is inclined to a significant swelling due to temperature drops. It is simply necessary when the building is being built on sedental, weakness, wetlands, coilded soils. The main advantage of such a foundation is to obtain an acceptable reference area on a relatively small plot of land. It is used in the construction of both massive heavy houses and small private buildings. The foundation is really universal and it can be used practically in any conditions, which is a big plus.
How is the tiled foundation? Peculiarities
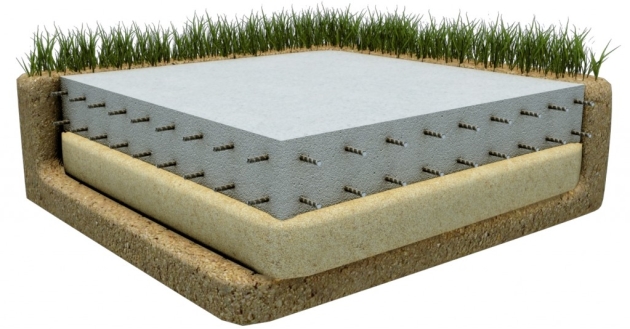
The standard device of a solid foundation is a solid reinforced concrete plate, which is placed on the area of \u200b\u200bthe built building. In fact, such a design can partially shift along with the soil without losing forms and strength. Such monolithic design significantly enhances the stability of the building to any loads that may appear due to the sedimentation of the Earth or changing weather conditions, which is very important for our climatic zone with cold winter and hot summer.
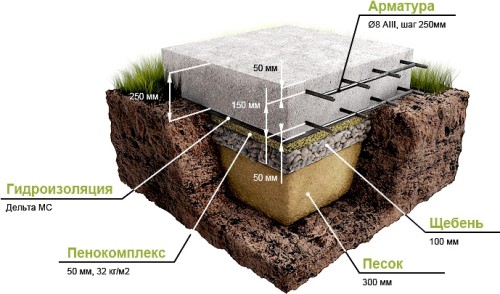
Consists of a tile foundation of three main elements:
- armature D12 A3;
- geotextile;
- sand pillow.
How to lay a solid foundation with your own hands? Stages of work
The main thing that should be remembered is at all stages of construction to avoid unpleasant consequences can not do anything. The exact calculation and application of knowledge in practice on the harvested plan will allow you to qualitatively do what each man is obliged to build a house.
Start with the calculations of key parameters
The first thing you need to do is to calculate a solid foundation with maximum accuracy. You must determine which thickness will be the stove, as well as the area and the depth on which it will be laid. Consider that the plate area is slightly larger than the area of \u200b\u200bthe built house. It is best when it is wider than one or two meters in each direction. It will not be a strong blow to your budget, but the building strength will add significantly.
The area of \u200b\u200bthe foundation is calculated relative to the total weight of not only the building, but also the foundation itself. Do not forget that he presses himself. Also, it is also necessary to take the carrying capacity of the soil, where construction will occur. For conventional dry soil, it is approximately 2 kg per 1 cm 2.
Important! Be sure to take into account the weight of the overlaps between the rooms in the house, roofs and even the usual snow, which will press the building from above for several months a year. Please note that there will be furniture, appliances and tenants themselves. To the resulting weight, thus, you need to add 150 kg / m 2.
When you get the total weight of the future building, divide it into the area. Now you can calculate the parameters of the foundation, taking into account the type of soil.
If two floors are planned in your house, the miscalculation remains the same. If the weight is 300 tons, and the area is 100 m 2, So, load per 1 cm 2 It will be 300 g. In this case, if you apply the M500 concrete, the foundation can be thin enough - about half a meter. Concrete strength is 150 kg per 1 cm 2.
Preparatory work
The construction of the foundation occurs in several stages:
- First you need to fully clear the selected area from all foreign objects. The surface at the same time should be smooth, as far as you can provide it. To achieve an optimal result, you will have to use the level. Although not the fastest, but a free way to align the surface with a shovel. All materials for work recommend purchasing in advance so that the process is not interrupted for additional purchases.
- When the surface becomes smooth and you completely clean it all from third-party items, you can mark the markup. In key places it is necessary to fix the labels. You also need to remove the top layer of the soil. It is about half a meter. The upper ground has weak bearing abilities, so it should be left immediately to get rid of it. The process of time consuming, so we advise you to use an excavator or attract people to work. Alone on it will take a lot of time and strength.
- When you cook the pit, lay on its bottom of the sand pillow with gravel. You can use rubble instead of gravel. The ratio of quantity becomes 2: 3. This pillow must be tightly tamped. Thanks to it, the pressure on the soil is distributed evenly, the moisture from the soil will be freely leaving under the house, and the power of frosty beating the foundation will decrease.
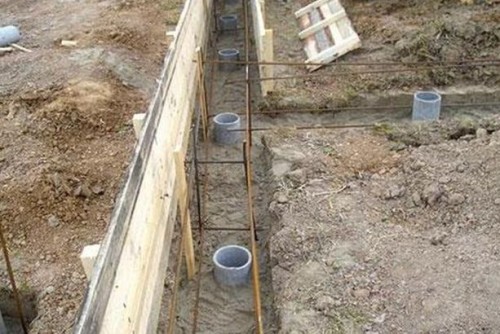
- Route along the future trench foundation for reservoir drainage. On their bottom it is necessary to eat geotextiles, and on top of pour rubble. We also recommend plastic pipes in trenches. They also need to be sprinkled with rubble, and so that they do not climb - to protect the same geotextile.
But before pouring a solid slab foundation, you will need to make another set of works.
Reinforced Frame and Formwork
- Install the rotary wells in the corners of the pittal. The fact is that the foundation is likely to stand on the basis with high humidity. Water at the same time will accumulate next to him. To avoid collecting water under all the foundation, the formwork is also installed. It must be installed in such a way that it goes beyond the limits of the proposed foundation at least than 15 cm.
- Now it is necessary to fall asleep another layer of rubble (20 cm). On top of it, they will fill about 4 cm concrete - he will act as the first screed. We recommend that the mixture of concrete and sand is also pouring the mixture of concrete and sand before filling, it lines the surface.
- Form a formwork for the fill of concrete. To do this, around the perimeter of the foundation you need to insert the racks, and to nourish any boards. Be sure to do it, referring to the level.
- To form a reinforced frame, you will need two iron grids: lower and top. They must be connected to vertical rods, which are placed in 20 cm from each other. To connect them, use a special knitting wire. We do not recommend using welding. In this case, bridges are formed, strongly subject to corrosion. Only now you can fill the foundation, the solid plate of which thanks to the previous stages will be really reliable support.
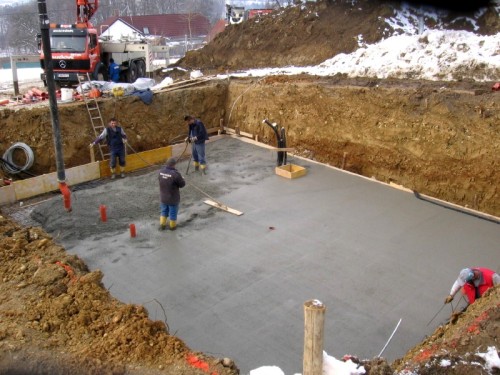
Pouring plate
This is a final and one of the most time-consuming stages of creating a solid foundation. You will need a large amount of time and strength to its implementation. If there is such an opportunity, take a couple of helpers who will help you prepare a solution and pour it into a formwork.
To prepare a mixture, use ready-made dry mixes, concrete, ordered from producers or cooked independently. Make a choice depending on your budget, time and strength. You will need cement, gravel and sand for concrete. Instead of gravel, you can use rubble. Finished concrete pour into formwork to the most sides.
Important! Consider that already after 3-4 hours, the concrete begins to capture and harden, so everything needs to be done as quickly as possible, and the solution is made right before you pour it.
Foundation is ready!
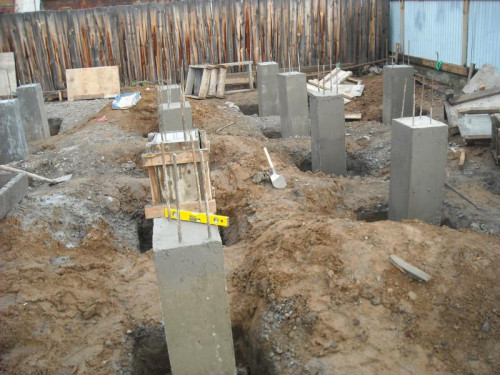
Features of columnar foundations
It is also necessary to say a few words about the use of columnar foundations, because the columnar and continuous foundations are quite similar to each other, and the technology of creating both is quite simple, for which they have deserved great popularity. Consider the key differences and features of the fill.
- Work also start with clearing the territory and initial markup.
- Determine the number of installed columns and dig in the right places of the pit at least 0.6 m. Depth depends on the properties of the soil. Difficulties arise only in swampy terrain. Here you need to do the base near the meter in the depth and at the same time a little wider.
- Cut the reinforcement on the height of the foundation pillars and the ruberoid to be collapsed into the tube with a diameter of about 10 cm (it is better to do two layers) and wrapped the valve.
- On the bottom of the pit, put the rubberoid leaf so that the ground does not absorb moisture from concrete. Now in the pit you can pour the first layer of concrete (10-20 cm).
- Immediately impose in the pit of the reinforcement with a refinery bowed on it. When the first ten centimeters fill, begin to pour the land around the column. It will interfere with the flow of concrete from under the tube. Thus, fill the top to the top and go to the next one. And so until the last.
The main advantage of such a foundation is low cost and considerable time savings. You also need to pay attention to the lack of need to use a removable formwork, which saves time significantly. Due to the fact that the column wrap the rubberoid, the soil does not face it in the cold season and does not push it out - the rubberoid just slides. The cement bag is enough for 5-8 columns. But in strength, it is still inferior to a solid concrete plate, so it is not suitable for large and heavy buildings.
Now nothing will prevent you yourself to start building a new home and finish it as soon as possible. And there is no more need to hire a dear team of builders to work that you can really make your own hands.













 Start a discussion ...