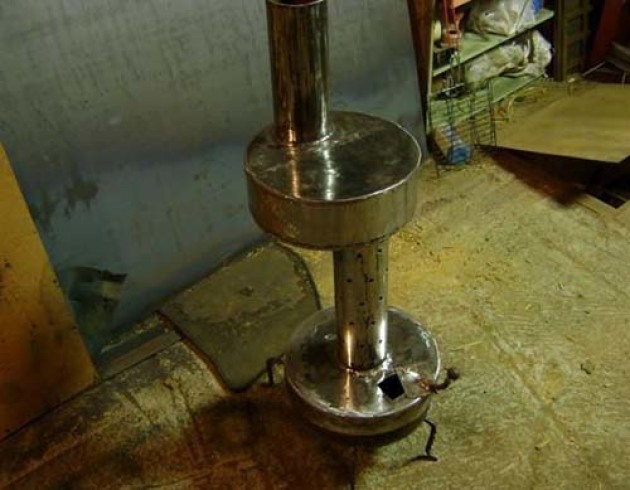
There are many devices for autonomous heating of rooms, but one of them has proven itself as the most economical and convenient. The furnace operating at the expense of spent engine oil appeared during the time of the USSR, but so far many consider it an optimal option for heating country houses, greenhouses, workshops and garages. It can be bought in the store, but as a practice shows, make a stove on the spent oil with their own hands will be able to any hardworking owner.
How does the oven on the oil
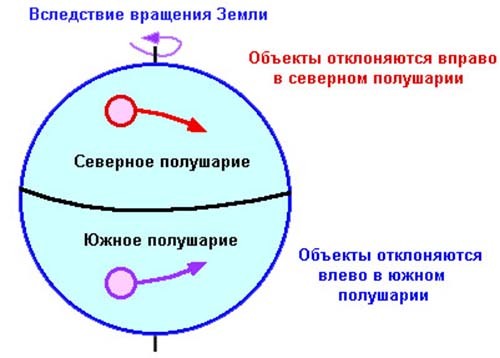
The appearance of the self-made furnace on working out does not cause any fears or hints of the complexity of execution, but the processes that occur in it during burning are very complex. To fully understand the principle of operation and the technology of assembling such an apparatus, it is necessary to recall the course of physics, namely the power of Coriolis. It arises as a result of the movement of the Earth around its own axis and indicates that the same thing for large objects is manifested slowly, and for small - quickly. Remember how water leaves the bath through the drain hole, twisting into the whirlpool is the power of Coriolis.
The degree of impact of the Coriolis force depends on the density and viscosity of the medium, so the water is "spinning" easier than gas. But what does the waterproof and why should we twist gas? Without such an effect, fuel will not burn effectively and safely. In order for the energy obtained from the combustion of the initial light fractions began to split heavier, giving the main heat, the fuel must be continuously stirred. To twist the gas, special supercharges and nozzles are also used, but make it possible to make such fixtures are quite difficult. It is much easier to apply the power of Coriolis.
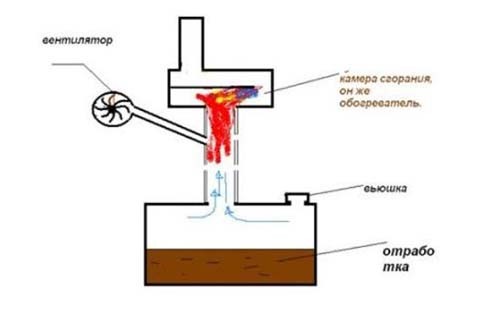
The principle of operation of the furnace on the workshop is similar to the pyrolysis stove are as follows: first the pairs of spent oil are lit and combustible gases are formed, then these gases are treated at a very high temperature. Because of complete combustion in the smoke, there is a small amount of toxic impurities. As a result, we have a perfectly heating stove that does not have a child.
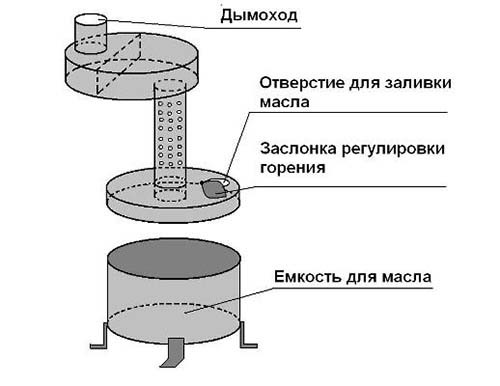
So that the combustion takes place completely, it is necessary to thoroughly follow the furnace assembly technologies. Regardless of the scheme, the oven on the spent oil consists of the following elements:
- The bottom part is the low-temperature compartment, combined with a tank. It has a hole to control fresh air supply. Through this hole fill the oil and ignite it.
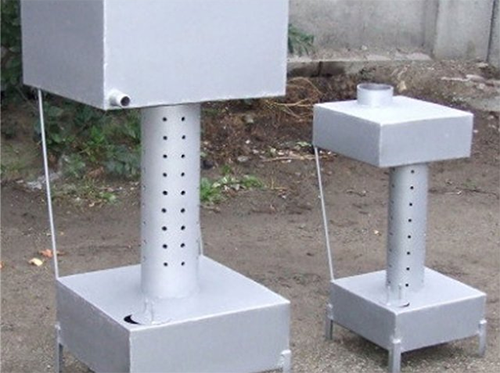
- The central chamber - in it gases mix with air and burn. The compartment is a pipe with holes through which oxygen penetrates.
- The upper compartment - in this part of the furnace trample the remains of the gas and formed smoke. A special pipe from bends is connected to the compartment to safely remove smoke. The length of the chimney should be at least 4 m, it is also very important to observe strict verticality. Otherwise, the nap from the spent oil will settle on horizontal sites, and the chimney will quickly clog. The top output of the pipe should be closed by the head assignment so that the wind does not blow there and the precipitate did not penetrate.
Advantages and Disadvantages of Design
The oven on the exhaust oil was invented more than half a century ago. Today there are many modern, more beautiful, productive and convenient analogues, so why many still do not want to part with the miracle of Soviet engineering?
Advantages of construction:
- Effective heating of closed rooms. The furnace is ideal for heating of greenhouses, kelves, sheds with bird and other pets, workshops, etc.
- If you build a stove correctly, it will not smoke and give Gary.
- Elementary control.
- A high level of fire safety, since the workout itself cannot catch fire, but only its pairs are burning.
- Efficiency - spent machine oil is very cheap.
- The possibility of manufacturing with your own hands.
Unfortunately, this furnace has several drawbacks, but they are not so fatal. For example, it is impossible to pour out spent oil with any impurities - they can create a fire-hazardous situation or score internal details. Before use, oil is recommended to filter or buy an already filtered mixture. To support the furnace in perfectly working condition, it is recommended to clean regularly. And the last drawback is a high level of noise with intense burning.
Types of furnaces
The oven on the exhaust oil can be made with their own hands "from scratch" or adapt for this pyrolysis and stove with burners, because they function along the similar principle - burned pairs. Inside the vacuum chamber, due to lack of oxygen, testing will be heated and distinguished by highlighting evaporation. They will rise above in the central chamber with holes through which oxygen comes. There they will light up, giving precious warmth.
The most convenient thing in such stoves is that you can control the burning intensity, giving more or less oxygen into the central chamber. However, pyrolysis compartments are very quickly clogged, and they must be cleaned regularly. Another disadvantage is that the oven is not able to work completely autonomously, and to maintain heat in the house, it is necessary to constantly monitor the work of the aggregate.
In the following chapters, we will look at how to make a stove on the development of "from scratch" from sheet metal and adapt an ordinary gas balloon for it.
Making sheet metal furnace
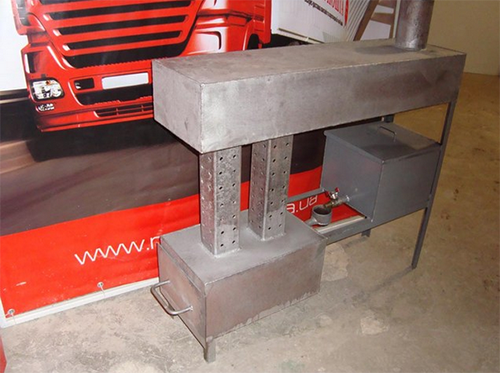
Let's start with the manufacture of the furnace on the workshop from the sheet metal, since this is the most common way. Popularity is explained by relatively low weight (only 25-30 kg), compactness and the presence of a small but very useful cooking surface. It can be helped with coffee or make a simple lunch.
What materials will be required:
- sheet steel with a thickness of 4 mm - 1 sheet;
- steel 6 mm thick - 1 sheet;
- pipe with a thickness of 4 mm with a diameter of 352 mm - 60 and 100 mm;
- pipe with a thickness of 4 mm with a diameter of 344 mm - 115 mm;
- 5 mm pipe with a diameter of 100 mm - 50 cm;
- steel corner 30x30 - 800 mm;
- pipe for burner.
We make oven on working out:
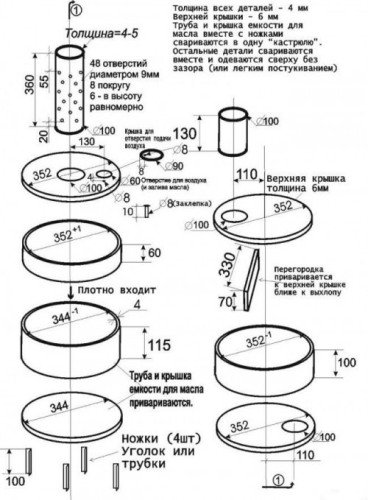
- First of all, it is necessary to pick up and print the drawings of the furnace on the oil so that they are always at hand.
- Make marking on sheet steel in accordance with the drawings and cut the items using a grinder.
- Cut the flat strip from sheet steel with a width of 11.5 cm and connect the two of its end so that it turns out the hoop with a diameter of 34 cm. Weaving the part in the dock. As a result, you will have a capacitive tube under the oil.
- To make a discharge compartment, cut off a piece of steel pipe with a diameter of 344 mm and a height of 115 mm. For the manufacture of the bottom cut out of the sheet steel, the circle of the corresponding diameter and weld it to the pipe.
- To make the lid for this container, take a cut of a pipe of 352 mm with a length of 60 mm, cut out a circle of a similar diameter and weld these parts. In the center of the circle, make markup and drill a hole with a width of 100 mm - another pipe will be attached to this place later.
- Closer to one of the edges, make another hole with a diameter of 60 mm - through it you will pour into the exhaust oil and squeeze it. Close this inlet with a movable lid carved from sheet steel. The part must be rotated on the axis. To make it easy to use the lid, weld a small handle. So, opening and closing the cover, you can adjust the intake of the oxygen furnace and the combustion intensity, respectively.
- The assembled design is put on the capacity for the bay of testing and tightly slide the items. This part of the stove must be left folding so that it was easier to clean it from Nagara.
- Cut from the pipe with a diameter of 100 mm a piece of 360 mm long and drill holes in 6 rows of 8 pcs. in each. The diameter of each hole is 10 mm. Ride the pipe in the opening in the coverage cover for testing.
- For the manufacture of the top of the oven, take the cut pipe of 352 mm and a length of 100 mm.
- From sheet steel cut 2 circles of the same diameter and do the holes in 100 mm in them - then the pipes will be welded in them (from the bottom of the pipe with 6 rows of holes, over-chimney). Cut out the openings eccentric so that their center spacing from the center of the workpiece by 110 mm.
- We weld the top cover to the pipe, and then attach the septum, mixing it as much as possible towards the chimney.
- Attach the bottom cover so that its hole is located diametrically opposite to the output in the upper lid.
- We weld the chimney nozzle with a length of 130 mm and a diameter of 100 mm to the output in the upper lid.
- We weld to the collected part perforated tube installed strictly vertically.
- Install the chimney pipe and the furnace supports, if necessary. For backups, use metal stripes. Check the tightness of all welds.
If you can't find pipes with such a large diameter, the upper and bottom compartments can be made in the form of boxes of sheet steel 4 mm - it will not affect the principle of operation.
How the oven works on the oil is shown in the video below:
Production of a gas cylinder furnace
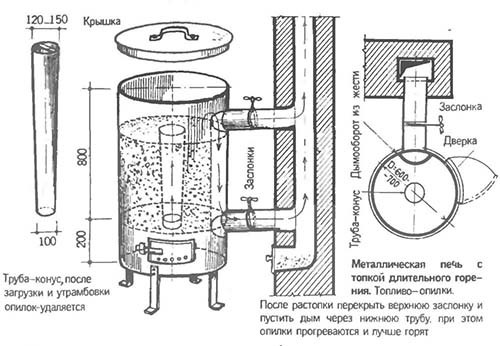
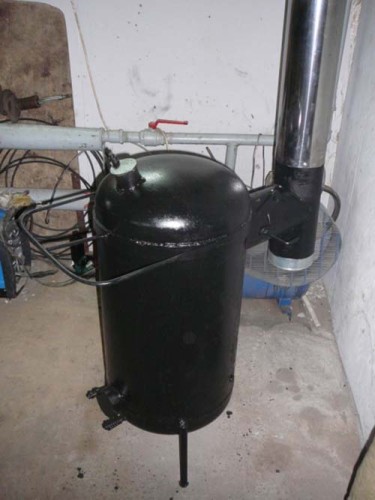
Make a furnace on the oil from the gas cylinder is even easier than made of steel. To do this, you will need a bolon with thick walls. Such an aggregate will allow you to heat the house with an area of \u200b\u200bas many as 90 m². In addition, such a furnace is actually converted to water heating, since it does not flow in it, as in the previous case.
What instruments and materials will be required:
- fuel tank for 10-13 liters;
- pipes for chimney with a diameter of 100 mm thick 2 mm;
- welding machine;
- used 50 l cylon, wall thickness 12-15 mm;
- steel corners;
- tubes for the burner;
- drill.
Progress:
- Drain from the cylinder remaining after using condensate and rinse it with water to remove the smell of gas.
- Skip the ball into the ground or put in the pallet with water so that it reaches the neck itself.
- Cut the top of the cylinder with the help of a grinder. The lower part will be a fuel chamber, and the upper - lid.
- We weld steel corners to the bottom - it will be the supporting legs of the furnace.
- Return 11-14 cm from the top edge and make a hole with a diameter of 100 mm for exhaust. Insert the tube of the corresponding diameter with a length of 4 m or more.
- In the exhaust pipe, make a hole and close it with a movable lid - with its help you will control the influx of fresh air. Install the chimney strictly vertically so that soot do not accumulate inside. The minimum allowable length is 4 m.
- Return 10 cm from the place of welding and make a hole with a drill with a diameter of 2-3 mm, then climb 5 mm and make another hole. Go above and above until 10 small openings are obtained to access oxygen inside. The last hole should be at a distance of about 60 cm from the welding location.
- Make a hole with a diameter of 60-70 mm for another pipe, insert it horizontally and breed to the cylinder.
- In the upper cut part of the cylinder, make the opening of 100 mm wide for the fill of the exhaust oil and the ignition of the furnace.
IMPORTANT: It is allowed to pour over to the oven from the gas cylinder no more than 2/3 of its volume. It is strictly forbidden to precipitate the oil into a lit furnace!
The homemade oven on the oil will allow you to save on the heating of residential or economic premises. This is a great option for those holding a cattle or small homemade livestock on the countryside. The oven on the workout is quite realistic to apply for the heating of residential premises, if noise is confused. To work, you will need the most ordinary materials that can be reached in any store, and the simplest welding skills. It is best to start with the arrangement of the stove from the cylinder to "fill the hand" and familiarize yourself with the specific assembly. You can then construct the furnace more complicated from sheet steel with a cooking surface.



 Start a discussion ...