Mansard construction recently broke all records of popularity - the cost of housing is growing, and the attic allows you to get an additional living area with minimal investments. However, the device like a roof has its own specifics and nuances that should be taken into account to get the expected result. In this article, we will consider in detail all the subtleties of the construction of the attic with their own hands.
Preparatory work
Start the construction of attic is necessary with the creation of a plan and evaluation of the condition of the supporting structures. In some cases, the foundation will not cope with additional load, for example, if you decide to build a attic on the old house. So that the base does not go to the ground and do not give crack, it is necessary to conduct a study and, if necessary, strengthen the foundation.
The second question to decide is to determine the type of design of the future attic. This means choose the shape of the roof and the finishing material. Not only the appearance of the facade, but also the size of the indoor space will depend on this.
Project preparation
The design stage from which any serious construction should begin is fundamental to all further work. Not only the end result depends on the accuracy of calculations, but also saving on construction materials and personal time. It is better to immediately refer to the creation of the attic of the attic seriously, then not to spend funds for correcting your own mistakes.
First of all, it is necessary to analyze the specifics of the planning of the building on which the attic will be taken. The analysis should include the size of the walls of the future design, the shape of the roof, the materials of the finish, the location of windows, doors, balconies, stairs, etc. It is important to consider every trifle, until what sockets you will install and which devices will be connected to them.
Assist in the preparation of the plan for the attic may be the corresponding SNiP, which describes in detail the standards and the requirements for construction. For example, the lines of the roof dock and the wall of the facade should be at least 150 cm from the floor of the attic.
What should be paid to special attention when creating a mansard project:
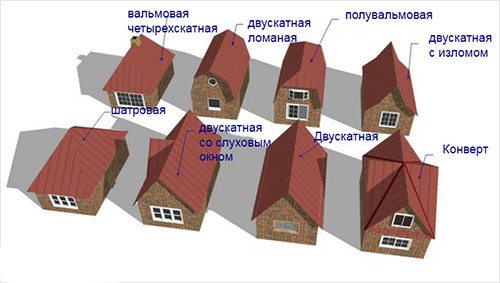
- The geometry of the roof - there is a duplex, four-tight, hip or other. The correctly calculated angle of inclination guarantees the convenience of operation and the spaciousness of the attic. So, the greater the angle, the less useful area under the roof, respectively, the reduction of the angle of inclination will allow the attic more spacious attic. However, too color roof will accumulate snow, rainwater and fallen leaves, so this moment must be thought out thoroughly. It will help to understand the corresponding SNiP, which describes the roof inclination standards for each region of the country, depending on weather conditions.
- Consider sharing engineering systems at home and roofs.
- Choose suitable construction materials. Remember, you can save and need, but not all in a row. When arranging the attic should be repeated from a small mass of materials, so as not to overload the bearing walls, overlappings and the foundation.
- If you doubt that you can make a roof frame or correctly calculate and install the solo system, it makes sense to hire specialists. But on the laying of roofing pie and the finishing of the attic can be saved, engaged in this work independently.
- Choosing the round-clock roof for the attic, consider that for such a design you need a special waterproofing material and insulation. Since the attic is a residential premises, then the conditions there need to create the appropriate.
- The finishing roof covering is usually covered with slate or tiles. It is better to use ceramic tiles, because the metal does not hold warmly and is very noisy during the rain (hail).
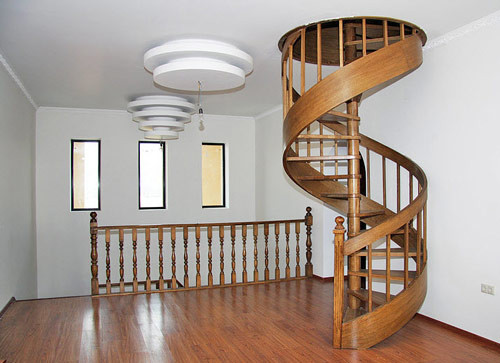
- The staircase on the attic can be located outside or inside the house. If you build a staircase outside, consider that the premises should be made to the best insulation of the room or at least install the double door. The internal stairs are much more convenient, but take away the useful area. One of the most economical options is the ceiling retractable staircase, which, if necessary, you can omit on the hinges or remove to the top. Screw staircases also save space, but much more difficult in performance.
These items must be based on the nancing project, and if you denote them, it will be much easier to work. If you have never engaged in such work, we recommend you to familiarize yourself with the mansard projects on the sites of developers or private firms, so as not to miss any important item.
Calculation of timber
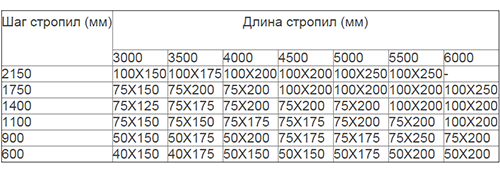
The calculation of the rafting roof system should be made very accurately and with knowledge of the case, since it depends on it, causing the walls of the attic of the attic will withstand. Depending on the angle of inclination of the rafter and the roof configuration, the load changes. If you doubt the power of the walls, they are better to immediately strengthen or choose not too heavy roofing design.
Installed construction norms will help to perform engineering calculation of the charter system:
The most common option for the roof for the attic is a double broken roof, but in this case the load on the walls will be much larger than, say, in a single-table design. But the advantage of the broken roof is that it provides the highest possible useful area of \u200b\u200bthe attic. Regardless of the selected roof type, it is necessary to create a powerful frame with a sufficient amount of supporting supports that can withstand vertical and horizontal load.
Features of construction
If you want to build a attic on the old house, you will need to dismantle the old roof. After dismantling, you can start installing the bearing elements of the design - Mauerlat.
Maurylalat for the attic
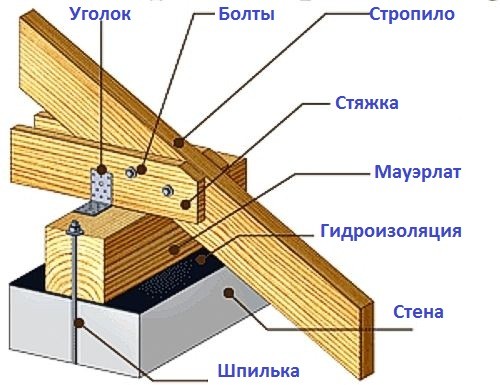
To fix Maurolat, specialists recommend using anchor bolts with a diameter of at least 12 mm and fix them into the layer of reinforced concrete. Before installing anchor, get it up to the end so that the hook is turned out - so you fuse fasteners from random pulling.
Professional designers make a detailed attitude of the attic, where the mounting points of Maurolalat to the wall are derived separately. There usually indicate the necessary number of anchors and their size. The bolt installation step can be from 100 to 150 cm.
Maurylalat is a powerful timber with a section of 150x150 or 200x200, located at the point of convergence of the roof and the bearing wall of the house. For the arrangement of the duplex roof it is necessary to install two vehicles, and for the 4-stranded will need, as you have already guessed, 4 bars.
Maurelat fasteners should be located between the bars of the rafter so that there are no too many rugs in it that can negatively affect the bearing capacity. For example, if you build an attic with the rafters located in the meter of each other, the anchor should also go with a step into a meter, but with a 50 cm offset to get up just between the rafters.
Useful advice: For mounting Mauerlat, always use only galvanized bolts to prevent the appearance of rust.
Install the support bar on the waterproofing layer. It can be a conventional rubberoid, plastic film or a modern waterproof membrane. If you make an attic in a brick house, anchor can be put at the time of the construction of bearing walls. To fix the timber in Mauerlat, drill the holes with a diameter equal to the diameter of the studs, and when the bar gets into place, secure it with nuts.
Slinge system
Mauerlat is the basis of the rafting system, and it, in turn, the "skeleton" of the roof. This carrier design must withstand the weight of the entire roofing pie and external loads - wind, snow, water, etc. Requirements for rafting systems are described in SNiP depending on the type of roof and climatic conditions of the region.
To improve the rafter system, you will need conventional tools that have each owner - a hammer, an ax, hacksaw, level, construction stapler, plumb, roulette. To build an attic of a bar and be confident in its durability, choose strong products without defects with a cross section of 100x100 mm for racks and racking boards with a suitable cross section. From fasteners will be needed with nails 100-120 mm, powerful metal brackets and antifungal composition for processing wooden elements. In a good way, all the bars and boards should be treated with disinfecting and antipyrene compositions. The most high-quality rafters are obtained from pine and larch. Material moisture should be no more than 22%.
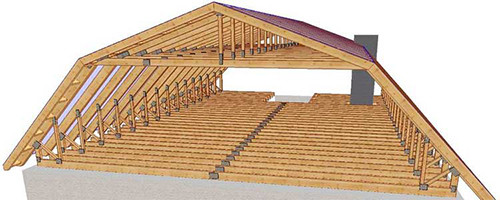
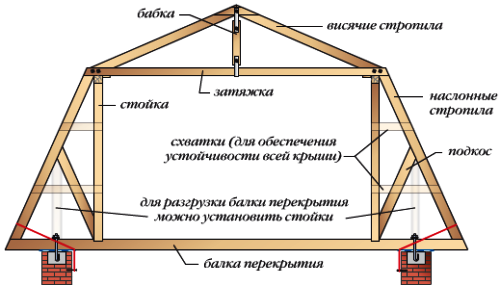
The rafters can be sloping and hanging. The inclined elements are resting in one end to the carrier wall, and the other is to run or rack. Hanging allow you to organize a small canopy of the roof of the roof over the wall at home, thus providing additional protection against moisture and cold. Connect rafters on the rod of the roof of the mustache or overhead.
Important: The racks of the rafter are attached to Mauerlat in the case of using wooden beams of overlapping, and if the construction is carried out on the reinforced concrete plate, the racks can be set at any point.
During the construction of a mansard roof, it is very important to properly organize a system of diagonal ties and subposses. To make items over time, it is necessary to establish a horizontal rigleel. For very wide buildings, it is recommended to put hanging rafters, tightening.
In some cases, not only wooden, but also metal elements are used to build a rafter "skeleton", but the difference in thermal conductivity coefficients can lead to deformations. In addition, metal parts need additional waterproofing.
Installation of roof
Each type of roof is characteristic of its own technology of installation, but there are general moments that require special attention. So, the funds, regardless of the roofing material, make it difficult to make it harder than to lay the coating, and additional problems may occur with the adjoints. Therefore, it is important to clearly follow the installation instructions so that in the future the places of the adjuncing to the pipes or walls did not give trouble.
How to build a attic:
- Install the support beams to be attached rafters. Before that, it is necessary to raise the waterproofing material (only or runner). It is not necessary to mount the bottom timber on the wooden floors, since the beams will perform its function.
- Install the racks on the beams with a cross section of 100x100 mm in increments of no more than 2 m. The racks should be located strictly perpendicularly by determining the position using a plumb. From the inside they can be attached to the plasterboard or plywood, to attach a porch outside, and in the middle to lay thermal insulation material. Fix the racks with a thickened connection or brackets. To maintain them in a vertical position, set the time disclosure.
- Place the upper bar with a cross section of 100x100 mm and secure it with brackets or nails.
- When substropsy frames are installed, you can start by Maurolat. Its main task is to ensure reliable attachment of the rafted to the carrier walls and the transmission of the vertical load. Since it holds all the roof and does not allow the wind to overturn it, it is better to additionally attach it to the wall with an annealed wire with a thickness of 3-4 mm. Under Mauerlat, it is necessary to put waterproofing material.
- Make marking on the rack and Mauerlate to install the rafter. Typically, the rafters are attached every 100-120 cm. First fix the extreme elements to the frontoth, following the top parts to coincide with the line of the edge of the front. Between extreme rafters, pull the twine, which will serve as a reference point for the installation of intermediate parts. At the end, connect the top parts of all rafters.
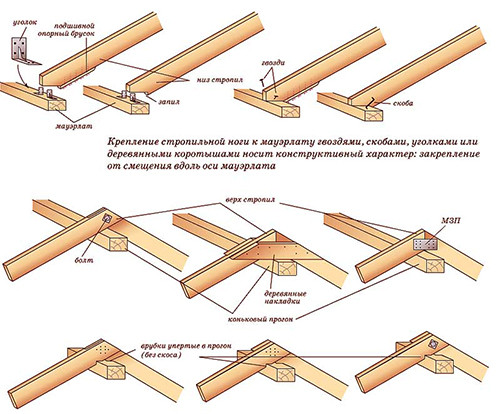
- Stropile legs should be dried into the skate beam (especially for large heavy roofs). If the length of the rafter does not exceed 8 m, there is no need in such a beam, it is enough to make stretch marks under the skate. They will serve as additional insurance in the event of a strong burden of snow on the roof.
- Install the kills along the same scheme as for the rafted - first two extremes, then pull the twine, and then fasten the intermediate elements.
- Send to the lumps the board of the heater so that the subcoase does not fall into the moisture from the precipitation and did not bloom the wind.
- In places allocated under the windows, strengthen rafters with transverse bars, which will serve as the basis for fastening window frames.
- When the roof is completely ready, you can start creating the crate. Attach the racks on the rack with a step corresponding to the installation requirements of the selected roofing material.
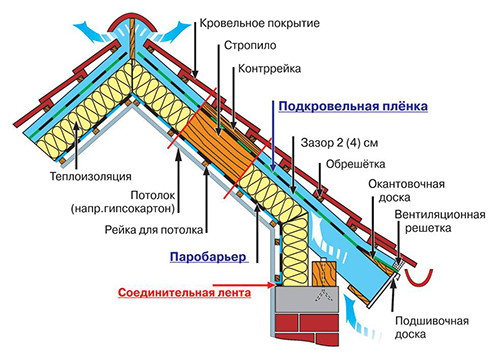
- Clamps come to the crate waterproofing material. It can serve as an ordinary polyethylene film with a thickness of 200 microns. Place the cuts of the brand film on 15 cm below-up.
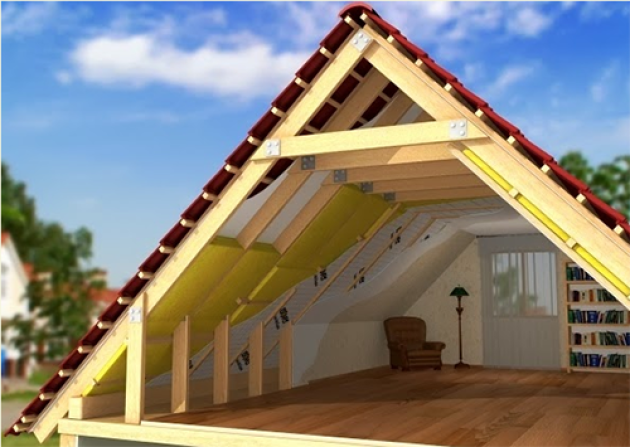
- Next layer put insulation. Usually for attic use inexpensive mineral wool - it is perfectly holding heat and serves for many years. To enhance the protective effect, the insulation is recommended to close with vapor insulation.
- Sell \u200b\u200broofing material from below. At the point of the roof of the roof, the downstream layer should be on the lower so that flowing water did not get into the "pie".
- Install the cover to protect against the penetration of precipitation under the coating.
Video about how to build a attic with your own hands, will allow you to better understand the whole process:
Heatsard thermal insulation
Separately, I would like to dwell on the insulation of the attic. The insulation of the attic room consists of three stages: protection of gender, frontones and ceiling. For all surfaces, one insulation can be used, the main thing is that it is resistant to the effects of moisture, has a low thermal conductivity, not burned and was environmentally friendly. Under these requirements, many modern materials of different costs fall. From the most inexpensive cans be distinguished by foam, polystyrene foam plates, mineral wool. Fiberboard boards can be used for attic located above the bath.
Consider the most popular insulation for attic:
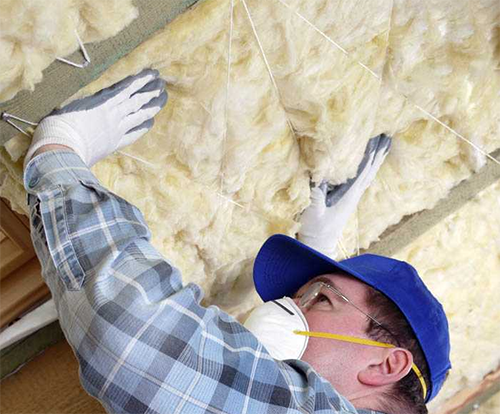
- Glasswater is a kind of mineral wool insulation and one of the most budget options, but the installation of this material is quite specific. It is especially difficult to work with glass gamble in the insulation of the ceilings, since it highlights a lot of dust causing irritation. Work should be carried out in a protective suit covering all the body, glasses, gloves and respirator. Despite a seductive low price, many prefer other materials, such as foam.
- Polyfoam is a traditional insulation used in various fields of construction. It is easy to work with it, it is well kept warm, does not absorb moisture and will last at least 10 years. The only drawback is a foam in a fire melting and highlights toxic smoke, dangerous to health.
- Polystyrene foam - more durable compared to foam, is distinguished by high vapor permeability and durability. Polystyrene foam can be used for insulation of rooms with high humidity. It does not burn and does not release toxic substances, therefore it is considered one of the best budgetary insulation for residential premises.
- Fiberboard is the optimal version of the insulation of the attic of the mansard over the bath. The material has excellent sound insulation, low thermal conductivity, not deformed. With it, you can quickly align the surface for laying the finishing coating.
We told how to build a attic, using the most economical materials and proven mounting methods. Interior decoration is carried out in the same way as in the rest of the houses at home. You can salary walls with wallpaper, paint paint, store the floor with laminate or lay a warm carpet.


 Start a discussion ...