Wood familiar to people for a long time. This is one of the first building materials that began to be used in the construction of buildings. Despite this, he still enjoys great popularity. Over time, the processing quality has become better. In addition, thanks to modern paintwork materials, it was possible to increase the life of wooden products, and without prejudice to their appearance. Thanks to such a technique as the "comb - groove" can be inhaling a new life in the usual wooden floors. It made it possible to make the laying of this material perfect and easier.
Content
Method of laying
To make flooring boards from wood massif as a material used valuable wood species. These, in particular, applies ash, oak, nut, tick. And such rare, as wenge and lapacho. Sometimes for the manufacture of boards, arrays of fruit trees are also used. These, for example, belongs to a sweet cherry, apple tree, cherry and pear. But the latter are more sensitive to moisture levels. In the event that the room is installed in the wood coating of light rocks, then you need to maintain temperature regime. At the same time, humidity should be at least 55%.
Fireless length can be from 55 cm to 5 m. In this case, the width varies from 60 to 200 mm. The recommended boards width is about 150 mm with permissible deviations of 10 mm per side. Plaques from 50 to 100 cm long can be laid by various technicians. It is recommended to mount perpendicular to the window. If the room is long or narrow, then the above rule is observed optionally. Otherwise, you will spend a lot of time to cut the planks of the desired length.
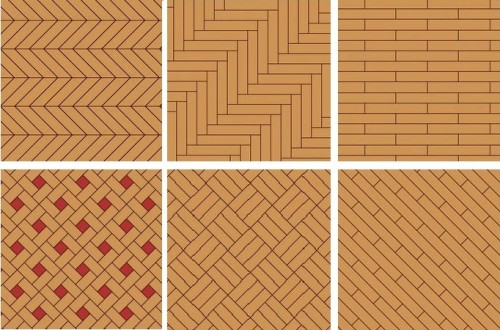
The following styling techniques distinguish:
- "Direct masonry." This technique implies the installation of genital boards gently along the wall.
- "Diagonal masonry". In this case, the boards are placed at an angle of 45 degrees in relation to the walls of the room.
- "Block". This is one of the classic techniques, or rather, the gender laying technician. In this case, the board is stacked by several pieces until a block of a square shape is formed.
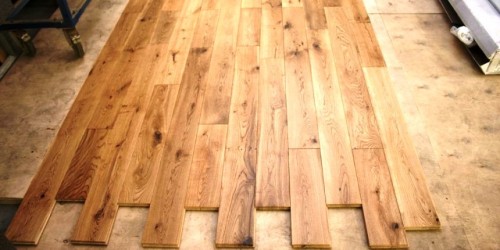
- "Chaotic masonry." This technique looks like a straight masonry. The boards are assembled in the same way, along the room, but each of them has a different length.
- "Herringbone 90". Pretty famous parking board equipment technique. It allows you to specially distribute the load, which is transmitted to the floor. With such a laying, the likelihood of the appearance of the gaps between the boards.
- "Vintage". In this case, the floor is placed by boards of various lengths and widths, as a result, the coating acquires a special charm.
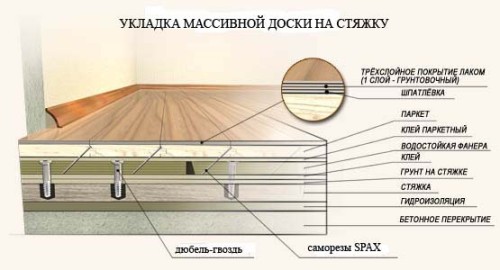
Less than the cost will probably be when laying boards on a screed. This does not require much effort, and there is almost no need to buy some additional materials. It will only be necessary to purchase glue. The level of humidity of the material when laying the board on the screed should be at least 7%. In the event that the glue used for operation is resistant to a change in temperature, you can even resort to the warm-alone arrangement. In the course of work on the laying of bars, it is important to achieve an ideally smooth surface. In the event that the screed has defects (potholes, height differences), then it will need to be updated. If the humidity is higher than the specified value, then it will be necessary to make additional waterproofing.
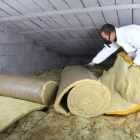
If the floor reconstruction is needed, then the installation of boards to lags is often used for this purpose. This method is especially relevant if for some reason it is impossible to use cement mixtures. On the lags, so-called podiums are equipped. You should also take care of the floor waterproofing, protect the surface from moisture penetration. There is always space between the lags and the insulation. It is desirable to fill in insulation. Then the plywood base is installed on the lags, after which massive boards are stacked on top.
How to choose a massive board
The massive board today is made from various wood breeds. It can be a "domestic option", for example, larch, alder, ash, tick, nut, as well as Grab and Oak. Either "foreign" wood arrays, such as Siam, Gevery, Meratney and Mersava.
Of the most banging rocks, you can call the cherry, sury, pear and other pink varieties. Behind the floor of such wood is very difficult to care because the necessary climatic conditions should be maintained in the room. Such coatings are not a place in the room, where there is an increased humidity or too high air temperature.
If there is a need to make the floor indoors with a frequently changing temperature, it is recommended to choose Keraja or Tompagling. You can also give preference to such varieties of wood as Kempas, Yarra, Amasosia, Iroquo, gum. As a board from an array of a dark color tree, you can use sea oak or a rosewood. However, consider when a massive board is chosen, you need to consider what force the pressure will act on the floor, and which there will be temperature differences in the room.
If there will be quite a large load on the floor covering, it is best to choose high-strength rocks, such as oak, ash or tick. If you want to put the floor in the bedroom, where there is usually there is no large cluster of people, you can choose practical any wood breeds.
Mounting a massive board on a screed
Before you start laying massive boards, you need to prepare a good basis. In particular, it should be integer, even without defects. In addition, it should be cleaned from everything that prevents properly to make finishing styling, for example, from construction garbage and dust. It can still remain an old coating, glue, sealant, which also need to be removed.
In the event that in the process of laying the base from plywood was too wet or irregularities, and there was dirt on the screed, then the piston flooring (boards) can change its shape or color.
The permissible moisture content of concrete ranges from 4 to 12%. If this indicator is below, you can use the humidifier if the desiccant is higher. In some cases, the specified values \u200b\u200bfails to achieve. Then the waterproofing is first in the screed, and then the plywood sheet is mounted on top of it. The material is attached to the screed using a dowel, whose caps at the end need to be dried. Sheets are shifted relative to each other in a special way: in one place there should be no four corners. Moreover, each layer of plywood must be fixed in 10-11 places. Another option is to plant plywood sheets on the screed and secure the design of glue.
Order order:
- First of all, you need to make sure whether the concrete screed is completely dried. To do this, for a day, a concrete base should be putting a mounting film. If it has not changed its color during this time, it means that the screed sound well and can be started at the installation.
- On the base of concrete should be laid a layer of waterproofing. For this suitable mastic.
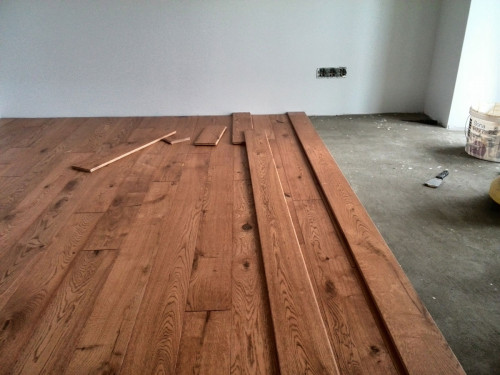
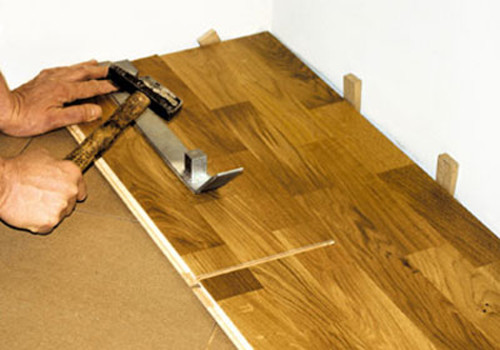
- Next, a massive board is styled for one of the technologies described above. The very first of the boards must be mounted in a special way, namely, spike towards the wall. It is important that it is not pressed close, there must be a distance of about 8-9 mm.
- The massive board is attached to the place with the help of 3 × 35-40 mm screws. It should be fixed along the edge through the front side. Self-tapping screws are fixed in a step of 250-300 mm. To avoid chipping and cracks, you need to pre-make holes in the board.
- When installing boards, the width of which exceeds 140 mm, it is necessary to make an additional fastening. It is performed through the front side. In this case, the fasteners are combined into wood by 9-13 mm, after which the resulting hole is closed with a homemade wooden wad.
When the installation works are completed to achieve an ideally smooth surface, the board must be pasted. After that, the material is covered with toning compositions and varnish. In some cases, a premium processing is used, which is that instead of paints and varnishes, the massive board is covered with mineral oil and rub with wax.
Installation on plywood base
This method in our climatic conditions is used quite often. And the first thing you need to do is protect the floor from the penetration and harmful effects of moisture. Then the plywood boards are prepared. They must be cut into squares whose dimensions are 500 * 500 mm, or rectangles (500 * 700 mm). After this procedure, the plywood sheets are put on the layer of mastic, glue. After that, they are fixed with fasteners, for example, dowels. One sheet is usually enough 5 fasteners.
The permissible humidity of such a base is no more than 10%. When a plywood screed is ready, you can start directly to laying a massive board. To secure slats, you can take two-component glue. Remember that fasteners through pneumoshpiles need to be made at a distance of 250-300 mm from each other. When all work is completed, you can slightly process the floorboard using a grinding machine.
Nuances styling
If it is responsible to come up to the fulfillment of basic works, then laying a massive board on the screed will not be difficult. Only one cannot forget about some important nuances to avoid further appearance of creak and sweepers:
- So, between the wall and the nearest board you need to leave the gap of about 10-20 mm. It is needed for free movement of the planks. The fact is that the boards under the influence of temperature and water change the dimensions.
- In addition, the first line is established in a special way, namely, turning the slap with the groove to the wall. Plinth will be settled between the wall and the floor. Therefore, it is allowed to install directly on the front side.
- All other rows can be fixed on the surface on glue or with special brackets. In this case, if the fastening will go on the front side, the hats are best hiding by traffic jams.
- In some cases, the last row, or rather, the last board, you need to cut to shorten. To do this, it is desirable to choose the shortest bar. Moreover, selected in such a way that one part of it turned out to be the last in the first row, and the other is the first in the next row.




 Start a discussion ...