Floor laying may be required not only at the time of construction of a new home, but also in cases where there is no strength to endure creaking floorboards, loose parquet or old worn coating. The floor on the lags is the optimal solution to the problem in all cases. It will not only eliminate the creaking, but will also increase the thermal insulation of the house, lines the surface and will allow you to hide the omnipresent wires and communications. In this article, we will in detail in detailed the flooring device by lags.
What is lags
The tree has always been considered one of the best materials for construction. And even today, despite the abundance of alternative building materials of the new generation, most masters prefer to lumber due to their exceptional performance. And if, for the construction of walls with a tree, gasilicate blocks or bricks can still be sought, then there are no equal in the field of floors of the floors.
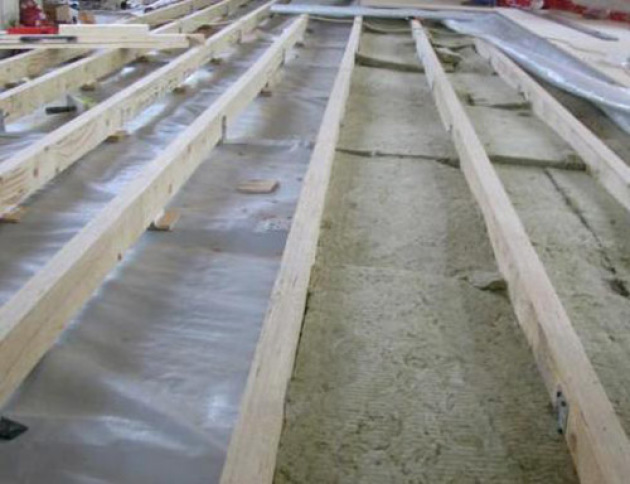
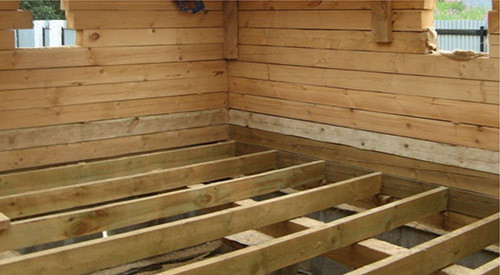
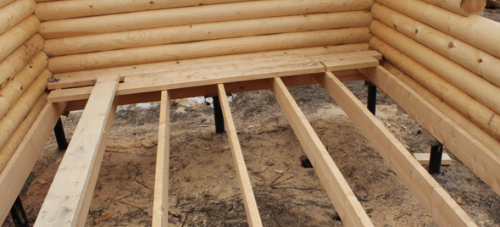
Wooden lags are powerful bars laid on the draft floor and closed with finishing coating. There remains empty space between the lags, which is filled with thermal insulating material, put communication and wires there. Thus, you can easily make any room much warmer and more comfortable.
Advantages of wooden lags for floor arrangement:
- Heat insulation - through the floor in a private or multi-storey building on the first floor, up to 10% of heat can leave. Lags with laid insulation between them create a powerful barrier that prevents cold penetration. With properly organized heat insulation, you can significantly save on the heating of the house.
- Soundproofing - If you make the floor on the lags in a multi-storey building, noise from the neighbors from below will never disturb you anymore.
- Uniform load distribution - relevant for private houses with low-power foundations. Lags evenly distribute the load and transmit it to the foundation, which, in turn, justifically affects the soil. Thus, lags allow to extend the life of the foundation.
- Paul alignment - often lags are used as one of the cheapest and rapid ways to align the floor before laying the finishing coating, such as tiles or laminate.
- Lags are able to withstand strong long loads up to 5 tons per quarter. m.
- Even the self-taught builder will cope with installation.
- Floor arrangement on lags will cost cheaper than the system of warm floors, the use of self-leveling polymer mixtures, substrates, and the result will be almost the same.
What makes lags
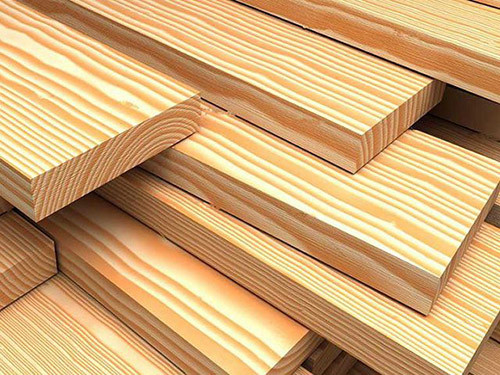
In most cases, lagows are made of wood, but there are also alternative materials, such as metal and reinforced concrete. However, in everyday construction, such too powerful and durable bars are not needed. They are used for the construction of industrial facilities - warehouses, shops, parking lots of trucks, etc. For the floor in the house on the lags, they choose wood because of the convenience of mounting and low cost.
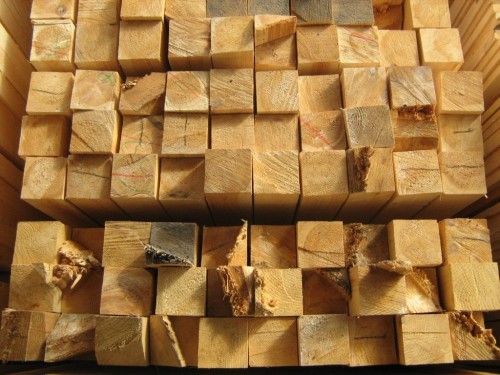
Useful advice: if it was not possible to find a whole bar for creating lags, you can use pairwise crosslinkable boards of the corresponding section size or a little more. In this case, the lags must be installed on the edge.
In the construction of chopped houses, instead of BRUSEV, builders use whole logs, trollen from 3 sides. This is a more economical way that can be applied with a limited budget. The main thing is how to dry logs. They have to spend about a year in a dry room, and only after that you can start laying.
Selecting section
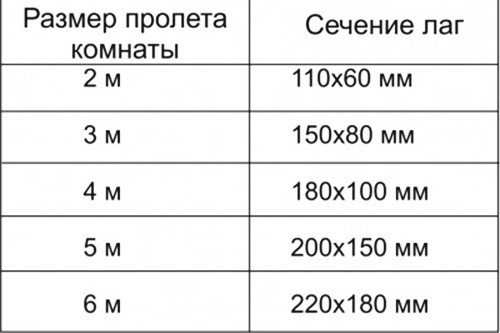
For the device of the wooden floor on the lags, it is necessary to select the cross sections of the bars depending on the length and width of the material. The cross section is a rectangle, the height of which is a multiple 2-m, and the width of a color 1.5. If the laugs are planned to be laid on a wooden base (overlapping beams), the size of the section will depend on the location of the beams, which will be laid down (the longer the distance, the more powerful lags are needed).
Also, when choosing bars for lag, the ventilation clearance should be taken into account at least 2 cm. This means that when you will lay the thermal insulation material, then there should be free space between it and the back side of the first floor so that condensate can freely evaporate and do not impregnate the insulation. And if you lay the lags on the ground, you should also take into account the dimensions of the ross, which will be attached to the cranial bar.
Specialists recommend in any case to acquire lags for the floor whose size is slightly larger than necessary. In order to save when working on the soil, the span is reduced by installing brick columns on which lags are leaning. The columns must be made of burnt red bricks and be from each other at a distance of about 120 cm. You can make them and from silicate blocks, but only if the groundwater on the site runs in 2 or more meters from the surface.
Installation Step
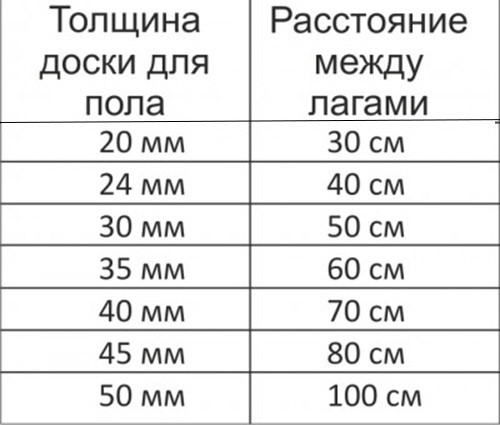
From how close to each other are lagows, the consumption of materials depends, so the installation step should be calculated at the stage of designing the future floor. This parameter affects the mass and strength of the finish coating. So, if the final floor material is designed for high loads, the lags can be laid away from each other, and if the material is "weak", they should be placed as often as possible. For example, if a board with a thickness of 20-24 mm will be used for the finish coating, then the lags need to be put every 30-40 cm, otherwise the floor will be fed. For thicker and durable boards (50 mm), the distance between the lags can be increased to the meter. In most cases, builders adhere to the "golden middle" - we ripen the floor with a thickness of 40 mm thick and put lags with a step of 70 cm.
Important moment: lateral lags should not fit into the walls, but also to put them too far. The distance between the wall should be no more step in the installation of the lag (usually make an indent to 30 cm).
Specificity of flooring on lags
Before making the floor on the lags with your own hands, it is necessary to prepare the basis. The specifics of work also depends on what lags will be laid. So, in private homes, it is mainly practicing laying on the wooden beams of overlapping and in the soil, and in the apartments - on a concrete tie. We will analyze in more detail the features of laying on each of these bases.
Soil under lags
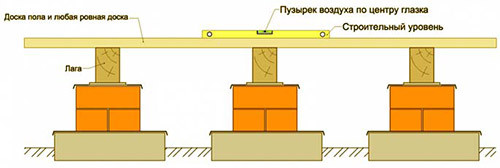
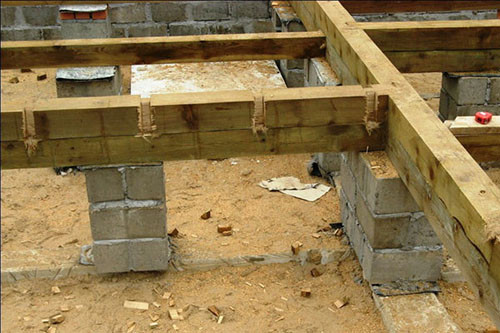
As we have spoken above, brick columns usually use brick columns to lay a lag on the soil, with 120 cm. This allows not only to save on the size of the section of BRUSEV, but also protects wood from rotting. For additional waterproofing between pillars and bars, the rubberoid is placed. The height of the underground (the distance from the Earth to Lag) should be approximately 20-25 cm. The main complexity is to create a smooth surface - for this it is necessary to build completely identical to the height of the columns.
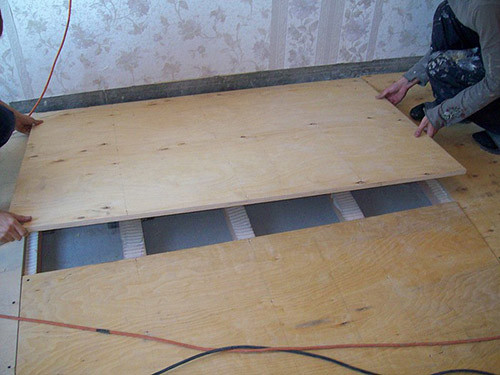
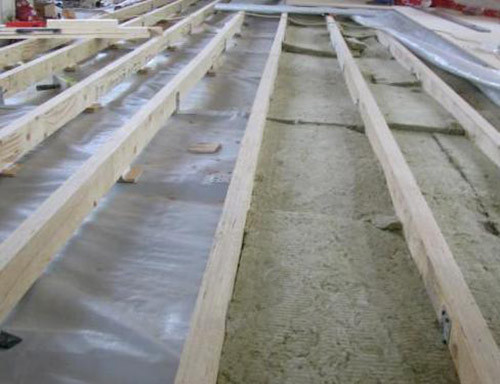
To lay heat insulation in this case, it is necessary to make draft floors on the lags - these are ordinary boards that are steeted on support rails and are not nailed. On the draft floor then laid waterproofing, insulation, etc. The result is a very warm protective layer, and for this floor you can walk barefoot even cold in winter.
Concrete and reinforced concrete
Laying the lag on a concrete screed or reinforced concrete overlap is mainly practiced in multi-storey houses. This is a great way to inspire an apartment, make it quieter and more comfortable. The floor on the lags allows, without special time and financial costs, align the base for laying parquet, laminate, tile or any other coating that requires an ideally smooth surface.
The step between the lags on the concrete floor is approximately 50-60 cm for all coatings other than ceramic tiles - since it is not durable, the distance is required to be reduced to 30 cm. To increase the rigidity of the lag, the concrete floor is covered with the reinforcing mesh, and between the bars are installed. As a result, small cells are obtained, which individually fill in the insulation.
Useful advice: If you are planning to lay the ceramic tile, you need to make a substrate for it, having a waterproof fane or plasterboard to lags. In the residential rooms, lay the lags perpendicular to the windows, and in the long premises of the corridor, hall). Pose them perpendicular to the movement. It will strengthen the strength and increase the aesthetics of the room, since the elements of the first floor must be put on the side of BRUSEV.
Wooden base
When laying the lag on the wooden beams, the overlap is quite difficult to achieve a flat surface, because the beams themselves often do not differ in perfectly level location. In such situations, lagows are attached to the sidewalls of the beams. The advantage of this approach is that there is no need to make lining to adjust the height of the lag.
If overlapping beams are too far from each other, two layers of lag are laid - the second is put perpendicular to the first. You can also make one layer of lag, but for the finishing floor to use thick strong boards.
Methods of fastening
Depending on what lags are stacked, there are several ways to fastening. Previously, in the device of this floor on a concrete screed or reinforced concrete beams, lags were attached by conventional long nails, and, as practice showed, it was not the most durable way.
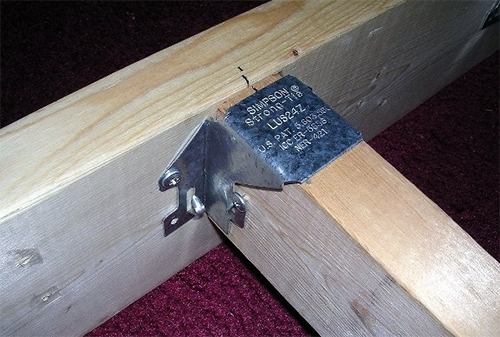
Today, more reliable fasteners are used - metal galvanized corners or P-shaped fasteners. The corners are fixed with one side by self-drawing to a wooden bruster, the other - dowels to the base. The depth of fasteners in the timber is from 3 to 5 cm. For brick columns when the floor arranges, the script is exactly the same.
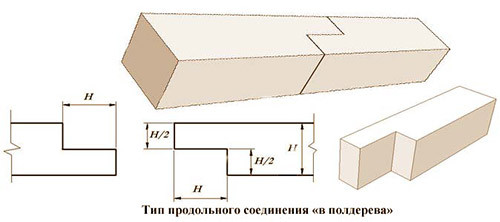
It often happens so that the lengths of the lags are missing, so the question arises: "Is it possible to build a bar so that it is as strong as solid?" There are two ways of dusting lag: iniquit about and writing ("in Polterev"). In both cases, the length of the element of the element should be at least 1 m. If it is necessary to increase several lags, be sure to displace the docking points of 50 cm or more so that the load is uniformly distributed.
Lag fixation to wooden beams overlap is carried out by incomplete screws. The length of the fastener should be larger than the width of the lag 2.5 times at a diameter of 6 mm. So that the wood is not split, before installing the fastener, the beam and the lag should be drilled in the right place. The diameter of the opening should be less than the fastener diameter by 2.5 mm.
Laying Lag: Step-by-step instructions
Wood floor installation technology on lags depends on the nature of the base. In this chapter, we will tell in detail how to lay lags on the soil, concrete tie or wooden beams. Perhaps, having familiarized with the theory, you consider it right first to make a concrete floor, the bay of it on the soil, and only then lay the lags. Many owners of private houses are exactly the same, resulting in a durable warm and strong floor.
Laying on the soil
To engage in the arrangement of sex on lags on the ground is best before the bookmark of the bearing walls of the house or during the interior decoration of the room. The finishing of the floor can be started after the ceiling and wall decoration.
Progress:
- We compact the soil under the future floor with the help of vibratory or wide logs (approach the land to the end until it becomes dense).
- Pour the granite rubble layer of 5 cm to provide drainage and organize an incompressible base.
- Seal rubble vibropilet.
- For each reference pillar, make a formwork (removable or non-removable), pour cement into it and strengthen the reinforcement. These will be "foundations" for brick columns.
- After the cement is frozen, it is shutter from each base of the rubberoid layer and build brick columns.
- On top of the poles, put two more layers of rubberoid and wake with bitumen mastics.
- Install on the lagows.
- Secure the cranial bar on the lags to make a support for styling a rough flooring.
- Make a draft floor made of cheap raw sawn timber. Do not attach boards to bars - they must lie freely.
- The draft floor will easily with a waterproofing film or rubberoid, making the wall on the walls at 15-20 cm.
- On the waterproofing between lags, put the insulation (mineral wool, clamzit, foam, etc.).
- On top of the insulation bed vaporizolation.
Between the vaporizolation and the back side of the first flooring, the ventilation gap should remain no less than 2 cm. The exception is the bilateral vaporizolation membrane, which will not allow moisture to penetrate into the insulation even without ventilation space.
Laying on wooden overlapping
Wooden overlap beams are usually made of rectangular bars. If they are installed in a step less than 80 cm, the lags may not need - the purple floor can be laid directly on the beams. But this happens very rarely, so the owners have to be engaged in installation of Lag.
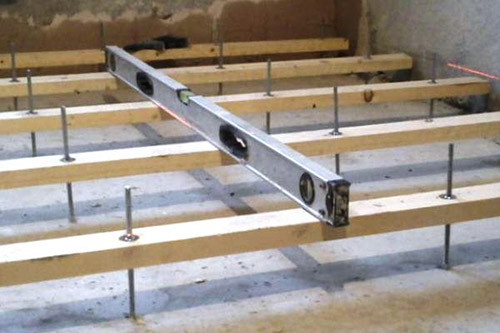
When working with a wooden base, everything is much simpler than with concrete or brick. The main difficulty is to properly determine the installation of the bars and firmly attach them to the beams. The first lag should be placed at 20-30 cm from the wall. After installing each element, be sure to check evenly with the help level.
As in the case of styling on the ground, here will have to do draft flooring if you want to get a warm and cozy floor. For thermal insulation in a wooden house, inexpensive materials are usually used - mineral wool, foam, ceramzite, eco-art, etc. The laying of the insulation occurs on waterproofing on the principle described above.
Concrete base
Laying the wooden floor on the lags in a multi-storey building will help to deal with several questions at once: insulation, sound insulation, alignment of concrete base. This method is one of the cheapest and fast, and compete with it can only dry screed.
To work, you will need a perforator, anchor bolts (length depends on the thickness of the lag), the vehicle screws with a diameter of 6 mm (the length is selected depending on the size of the cross section of the bars), polypropylene dowels. For wood processing, a hammer is needed, hacksaw, plans. To adjust the flattering floor, prepare a building water or laser level.
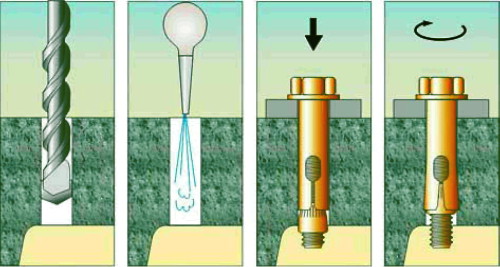
Carnate lags to concrete floor can be self-drawers or anchor bolts. Anchor is more expensive, but provide a reliable and durable connection, so specialists recommend using them. The image below shows the principle of installing an anchor bolt.
Lagges can not just be put on a bare concrete tie. Before that, concrete should be processed by the concrete with a primer composition of deep penetration and to be seal with waterproofing material. It can be rubberoid or a conventional polyethylene film with a thickness of 200 microns. The bars themselves before laying must be treated with protective compositions from rotting and antipirens.
If a concrete base has strong drops in height, then adjust the level of the lag is needed by lining. To do this, you can use ordinary wooden peasants, boards, fane or chipboard. There is also a so-called adjustable floor on lags, which is installed on special screw supports - twisting them, you can change the height of the elements.
Progress:
- Clean the concrete screed from the garbage, treat the primer and wait for it complete drying.
- Shipping the floor with waterproofing material, making a break on the walls by 15-20 cm. Rolled material should be laid with an adhesive in 15 cm, connecting the joints with a wide power.
- Spread lags - first lay the extreme along the opposite walls, retreating 20-30 cm, and then proceed to laying intermediate elements with a certain step. On average, the step of laying the lag on the concrete base varies from 30 to 80 cm depending on the material of the first floor.
- Adjust the smooth lag and tension the lace between them - it will be a landmark for laying all intermediate elements.
- If the lengths of the lag are not enough, lay them on the joint in the joint (do not forget about the shift of the docking points by 50 cm). If you work with high lags, extension should be produced in Poltera.
- Drill holes at the base and lags, laid a dowel in them or the spacer details of the anchor bolts.
- Screw the screws or bolts. One lag should be attached 2 or 3 anchors located 60-80 cm from each other.
- Before you turn the fasteners before the end, check the fatality of all items.
- Place the thermal insulation material between the lags.
- On top of the insulation, place vaporizolation.
It remains only to mount the finishing floor or make a substrate (for laying tiles, laminate or parquet).
Finally - video about the installation of adjustable lags on a concrete base:
Make the floor on the lags under the power of any hardworking owner, even if he had not been involved in anything like anything. This work does not require complex calculations and large financial costs, so if you need a warm and smooth floor, boldly solve the installation of Lag.



 Start a discussion ...