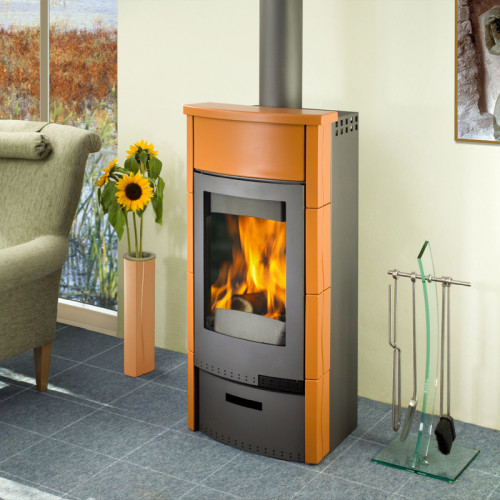
The classic Dutch oven is one of the most popular heating devices of the last century and continues to warm up modern houses and to this day. One of its most important advantages is that it can be folded independently even a beginner.
The appearance of a Dutch-type oven can be attributed to the XV century. In Russia, the history of the creation of a round furnace begins with the time immemorial times of Peter the Great, which was already the dominant for any home. At that time, the king ordered the construction of stone houses in St. Petersburg, and at the same time a brick oven with chimney and the so-called cap appeared.
Such "Holland" is a ram of a round oven in a case, and she received her name because it was further laid with tiles made by potters from the Netherlands. Later, at the time of the USSR, the round metal furnace could be seen not only in residential buildings, but also in urban institutions. It is pretty simple and in use, and most importantly, very practical and safe.
Round furnace device
The basic principle of operation of such a heating furnace is quite simple and lies in the fact that by elongation of the flue gas paths with artificial means they give all their heat as it is passing. It is quite difficult to disrupt such chimney, so the design of the furnace does not have specific subtleties. The first Dutch was installed on the focus in close Dutch houses for strong heating at low resource costs.
The furnaces were created for 5-storey houses in the form of box structures from a minimum of light material. Initially, such stoves were designed with a deep furnace, but later the modification was added to the lattice and the lattice. Today, such furnaces are developed for individual requirements using computer programs.
Today's modern technologies make it possible to give the heating device an improved appearance and a variety of color. However, the one who loves old and traditions, this furnace will have to do. She will warm up, in the literal sense of the word, and the mood will raise.
Pros and Cons Round Metal Furnace
Dignities of a round oven in a case
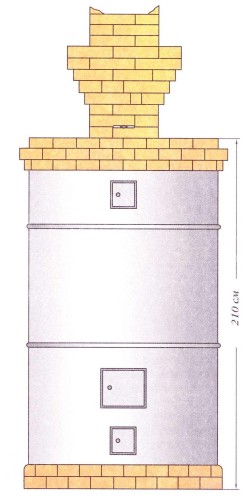
Heates the round furnace of the room with an area of \u200b\u200bup to 60 square meters in size in a width of 0.67 m and a height of 2.33 m. It, of course, cannot be removed by productivity with a coal boiler. Although, if in the house electric heating, then in emergency situations, when there is no power supply - this oven is the best solution to problems.
The main advantages of such a heating device are as follows:
- Safety in the presence of a metal case that protects against the penetration of carbon dioxide into the dwelling;
- Rapid heating and slow cooling, which reduces fuel reservoir;
- The possibility of lengthening the design into several floors;
- Long term with proper care and proper use;
- Changes in assembly practically do not affect efficacy and strength;
- Compactness of dimensions and a small occupied area for any heated premises;
- Small weight design;
- The presence of a streamlined form and the absence of trauma for the user;
- The presence of a fuel door with refractory stained glass windows;
- Low temperature difference and uncomplicated chimney design;
- Low material consumption with sufficient heating;
- No need for constant or preheating after idlers;
- Increased heat transfer as large-sized ovens;
- The cost is cheaper than a conventional brick oven;
- Convenience in decorating with modern stable coloring substances (if desired, color can be changed every year);
- Wide functionality due to the initial capacity of the construction of plates and additional modification;
- Efficiency in consumption of materials.
Negative aspects of a round oven in a metal case
The facilities of the furnace are much higher than its disadvantages, which increases its popularity:
- The possibility of fast cooling without closing the cap, as the siphon system delays cold air;
- Insufficient performance for the large area of \u200b\u200bheated room;
- Performance insufficiency with light fuel and the need to maintain the smuggling mode;
- The hazard of the fire of soot when furnace is low-quality cheap material;
- The risk of separation of carbon monoxide during the overpowering;
- In the absence of low heat capacity requires a multi-sized daily protest.
Round oven installation recommendations
The design of the furnace is simple, so collecting such a furnace is quite accessible. The metal case consists of three parts called the Tsargi. They put on one to another alternately.
Materials for assembly
Approximate list of materials required for self-assembly:
- Clay conventional - 0.06 m³;
- Clay refractory - 12 kg;
- Door pensive - 0.13 x 0.14 m - 1 pc.;
- Fake door - 0.21 x 0.25 m - 1 pc.;
- Doors are cleaned - 0.13 x 0.14 m - 2 pcs.;
- Removal valves - 0.13 x 0.13 m - 2 pcs.;
- Conventional brick - 230 pcs.;
- Brick refractory - 70 pcs.;
- Foremost sheet - 0.60 x 0.80 m - 1 pc.;
- Sand - 0.04 m³;
- Grille grate - 0.18 x 0.25 m - 1 pc.;
- Ruberoid for waterproofing 0.70 x 0.70 m - 2 sheets;
- Roofing steel for a case - 6.7 m².
Round furnace mounting with your own hands
For such a furnace, a combined masonry scheme on the edge and plastics are applied:
- First we do the foundation (can be round or rectangular).
- In the steel diameter casing of 100 cm we carry out a masonry that is installed on the base. It is laying out so that all the circle from the casing to the edge of the base was the distance of about 20 mm.
- On the foundation, draw a circle with a radius of 520-530 mm to start laying the base.
- We put in a circle of I level of five halves of bricks Plafhmy. We determine the middle of the circle, drawing it out on a sheet of paper with a radius of 510 mm, cutting out and folding in half - the line on bend and will be its middle.
- We put the folded sheet folded in half exactly with the edge on the laid out of the level of bricks and draw a line in the foundation by determining the middle point of the furnace. On the line, we note the middle of the rear and front partitions.
- The masonry is carried out by a label on the posterior partition on a solution of 2 solid bricks with a rounded skener. The border between bricks align so that it is one line with a label of the front wall.
- With an end border, there are 2 bricks. Thus, we obtain a flat square masonry inside the rounded, and the level of the base station will be filled with masonry.
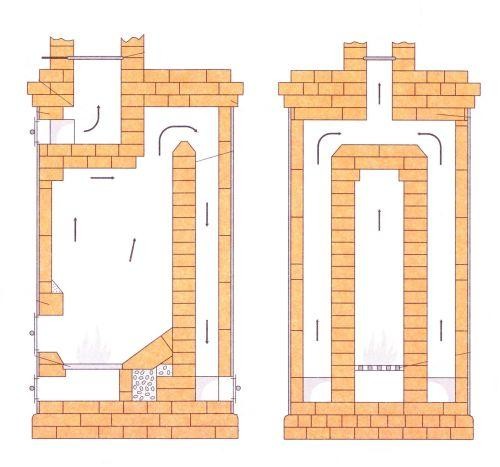
- We post the second level with whole bricks with the crane edge.
- Calculate the level of shy bricks. Under the laying of the level II, the diameters of the circle, retreating from the border I level 250 mm. Then we determine the size of the circumference I and II level. The length of the outer part of the base is divided by 12. Thus, we calculate how many bricks should be postned by recalculating them in length (for example: if 29 bricks are needed for masonry, we divide the entire inner circle to 29, and draw the resulting shape to the end Brick).
- By this label we will make the layout and apply it when choosing bricks, which are processing across the entire width of the end. From the label to the corner of the brick, we carry out a line - tag tank.
- Drain bricks is better all at once. During the masonry process, vertical seams are formed. They will also take place, so most likely the material will leave less. We harvest 27 pieces.
- It is possible that the last brick will have to be stronger to complete the level. The masonry we carry out the cut side in one direction along with the outer boundary of the base. The sharp edge of the base must be rushing at the protrusion.
- We begin to lay the furnace from the third level, but first we draw a circle on the base, less than the inner radius of the casing by 15-20 mm. As in the I level of the base, without a solution we select III level.
- On the solution put the material. Using a circle of paper (folding it fourwise), as in the I level, we find the center and note it.
- The layout of the level IV is carried out according to the outlined points in the center and in the middle. The lower ring of iron casing is planted on the III level, covering the marking of the paper.
- The casing is easier installed on a plumb, if the top level of the base is complicated exactly in terms of the level. It will not move if the gap between it and brick is filled with mortar.
- When the solution from the area of \u200b\u200bthe casing will dry, you can continue the masonry. After that, we remove the paper, and the laying continue.
- We harm the solutions of two consistencies. The first for masonry is medium in thickness. The second for bricks to the casing - liquid.
- To do this, take 2 buckets with water and clay medium in thickness. To get a diluted solution, add some water to clay and mix them at the top. So we get 2 solutions in one container.
- To lay out the I level that adjoins the casing is not easy, so we take into account the height of the rings (there are 300 mm), which must be connected between the doors of the foil and subductive holes. There will be more than 3 such rings.
- From the installation of the casing rings depends on the appearance of the stove. The number of rings we select, given the magnitude of the height of the furnace. The casing during the masonry is not shunken, if it is close to its ring from the outside to attach several bricks.
- Level I layer is carried out so that the corners of bricks on the inner side are clearly sealed to the surface of the lower level. This moment take into account when laying and at the top levels.
- If the brick is laid out clearly in terms of level and plumb, then the furnace is flat. The middle of the laid out material acts inside the masonry, if the furnace diameter is small, then it is permissible. Bricks should not stick to the sides, so vertical connections must coincide.
- After the end of the masonry in the level it is recommended to squeeze the brick crushed stone into the vertical seams to the linen with the casing, because they come out thick. As a result, the mixture constructed, and the heat transfer coefficient will increase.
- In a round stove, install curved doors. To do this, in the rings of the casing cut the deepening. In the stove inside the furnace, we perform horizontal and vertical labels, given the dimensions of the door openings.
- Dimensions of devices must be similar to the holes of the casing. There should be no holes between them. They should be close pressed to each other.
- The width of the partition with a solution can reach 60 mm. The masonry inside the stoves we carry out a globular brick plaffer with the final dressing near the wall.
- Levels near the casing can be different at the top. Consequently, calculating them in the internal spoon levels. In the casing cut in advance 4 opening under the door.
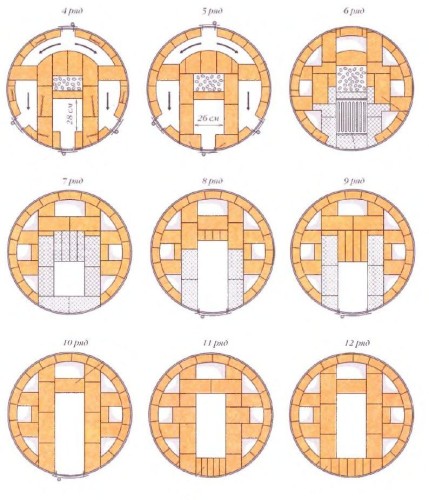
- The laying in the IV level is preferable to start with the mounting of the imaging door and 3 cleaning doors. They are located 2 sides from pissed ahead.
- By the door of the wire tie, but its ends are extending into the slotted holes and press down to the casing. The door set at the solution, pulling and spreading in the wire 2 side.
- After installing the door bricks podtesyvaem and customize. Near the place podduvalom whole bricks. Before the door lay 2 quarters.
- Cleaning near the door lay a brick, squared it and having adjusted for height, taking into account that the width is equal to 1/4 of masonry brick. To the left of the door blowing masonry is already a solution of bricks.
- Podtesyvaem brick to the desired type and place. Masonry finish fourth.
- Conduct similar masonry to the right of the ash-pit door. Following two trehchetverti spread around the housing toward the door of the ash-pit.
- The fourth level approximately housing spread of identical halves brick height due to the fact that all the doors of the same height. Since halves brick height identical with a brick, the required amount of the halves can be prepared in advance by the pattern.
- Put the left side of the stove to clean behind the door. Then spread the ash pit and the right side of the stove.
- In level IV resulting vykladyvaniya wall 2 are obtained from whole bricks which reach the housing. These partitions are formed by the housing near the lower 1/2 brick.
- In level IV obtained through the partitions 2 duct 3. In the process of putting some doors stretched around the wire wrap up.
- We spread the V level the bonded center oven and over baffles fourths leveled laying. The masonry ash-pit cameras produce a recess under the grate and set it.
- Lateral inserts at the boundary in pushing the bricks VI and set flues wall 4, whereby the laying occurs bunch with borders, acceding to the casing. About creating housing masonry 260 mm high. On over partitions is correcting for this level.
- Near the grate in front of the stove quarters of brick masonry with a bunch of produce flat. The flue pipes must be identical in size.
- The clutch 2 through the casing near the level produce a bundle with the inner flat brick masonry. In conjunction substitute quarter plate or the top and bottom stretcher level. Perhaps the use of trehchetverti.
- From the furnace door to the grate in the VII level produce bias. Behind the grate to produce tilt IX levels.
- Furnace door set at X with VIII level. We continue laying the saddle border on the X level raised.
- Above the door of the furnace from the XI level, go to the laying of the arches of 5 bricks. We enjoy them 16 mm from one side in the direction of bottom.
- 2 bricks on the left side and 2 - with the right, and the middle - from 2 sides of 8 mm.
- The arch has fifth bricks. Before it is laid out, first install the fifth bricks and hold the masonry near the casing. The lock brick is installed in the strut between the walls of the arch, squeezing it.
- Arch masonry at the bottom is uneven. Orthodiy we enjoy "No" separately on each brick. Top of irregularities are not noticeable, it means that they should not be removed.
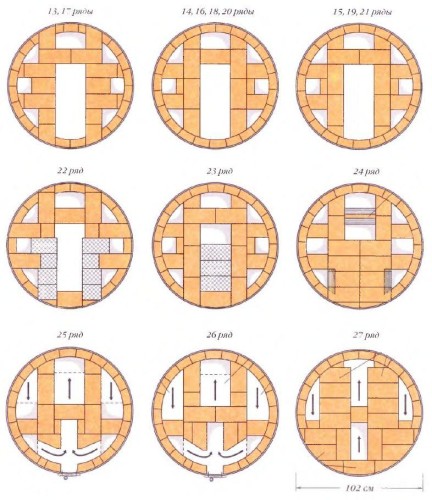
- Laying the arch is completing in the XII level. From above the arch in the XIII level laying, we fit on the ring masonry near the casing. Until XXII, we carry out a masonry with a bundle.
- In the XXII level, on top of the furnace on two walls, we make protrusions at least 26-31 mm. In the XXIII and XXIV level, we make overlap on top of the furnace.
- In the XXIV level, we enjoy 2 sides of the upper brick of the transfer partition and bricks, which are under the pipe on the bending of the gas ducts. In the XXV and XXVI levels, we carry out the laying of 2 small oncoming horizontal gas ducts, the cleaning windows, where we put the door, transition windows made of gas ducts and the window through the translated partition.
- In the XXVII level, we perform overlapping from the top of the cleaning door with horizontal risks. Less all the laying on the level and create overlapping the stove.
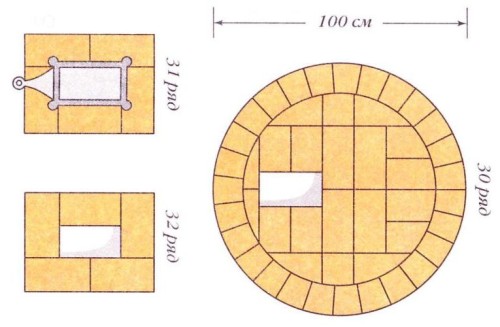
- In the XXVIII level, we carry out a masonry with an allowance of 35 mm across the entire surface of the furnace (identical laying at the second level). The size of the gas should be equal to the thickness of the pipe. The pipe should stand on a tough basis, simultaneously attaching over the lateral boundaries with the maximum part of the brick.
- In the XIX level, we still have a breakdown for the cornice. In the XXXI level lay out the pipe, they put the valve on it, from top to which the pipe passes.
Functioning stove
A round oven in a metal case is adapted for virtually any solid fuel, except peat. The gas from the furnace is heading at the top and through the translated partition descends down the book, and there it is divided into 2 directions of the furnace along vertical channels. In the VI level, the gas, which passed through the windows, enters the first two triangular gas ducts that pass near the furnace rises at the top.
From XXV to XXVII, the gas level flows into vertical rectangular gas ducts and descends the book. In IV and V levels, gas flows through the windows of 2 two vertical triangular channels and enters up, turning into horizontal gas ducts, stirring and flowing into the pipe. The cleaning of the stove should be started with the pipe and spend the bottom through the special windows below, that is, at the same time there are two gas pipes through each window by thick wire with a bow.
It is believed that such a furnace will be able to collect any owner, and if you thoroughly explore the instructions and a furnace case, it may turn out a good oven. However, before starting to build a stove, it is recommended to refer to a good cook for advice. After all, the safety of the dwelling is more priority, and a qualitatively folded oven will always warm and decorate a small house.
Video example
You can get acquainted with the finished example of a Dutch furnace on the video material:



 Start a discussion ...