The right choice of flooring is an important component of the finishes. Not only the aesthetic perception of the house, but also reliability depends on this. Natural, environmentally friendly materials in this regard are certain favorites. Wood allows the floor to "breathe", while maintaining the microclimate in the heating and climatic systems of the room. Alone to perform the laying of the wooden floor bye for everyone. But without professional recommendations, start work - the purest adventure.
Choosing wood
The main stage, as in the repair as a whole, is the preparation. When choosing, it is important to take into account the financial capabilities, degree of loads, climate, type of room. For compact structures, coniferous species of trees are recommended:
- spruce;
- cedar;
- larch;
- fir;
- pine.
Flooring from these rocks are distinguished by durability, financial availability, strength. In the average price range, traditional oak is highlighted, as well as alder and aspen. Rates for wooden flooring from these materials will be much more expensive.
Important wood selection nuances:
- Before flooring, the tree should be dried. The raw material is necessarily deformed under loads. Peresked wood is also easily deformed due to the absence of a sufficient moisture for flexibility.
- Purchase material (2 m long) with a tangible stock.
- Carefully examine the boards for cracks, bitch, spots from the resin. Do not buy material with lots of defects.
- It is desirable that all the boards belong to one party. Both the drawing and the degree of drying in this case coincide.
- For flooring perfectly suitable and edged wood. Such material does not require grinding. The cost of laying a wooden floor from these materials will be minimal.
Types of wooden floors
For laying a wooden floor, as in the video example, use:
- parquet panels from the massif;
- array boards;
- parquet classic (small slats with grooves and tongs from all parts);
- adhesive parquet board
Wood floor laying technology
The laying is made from a shield parquet, board flooring or parquet boards. Technology varies depending on the type of residential facilities. So, in a wooden house, the flooring is installed on the ground using lag or overlap beams. In buildings from the bar, two-layer is provided - the base and the wooden flooring directly. Naturally, the price varies depending on the technology of wood floor laying.
Wood processing
Lags and gaskets are recommended to be treated with a substance to increase refractoriness - antipiren. From the occurrence of fungus will help biopropite. In case of ignoring surface treatment with chemicals, the high cost of work on the wooden floor laying will be unjustified.
Waterproofing
Waterproofing is a mandatory installation of wooden floors. As an insulating material, select foam or polyethylene (oilcloth). Penofol is preferable because the substance also provides noise insulation.
Base for wood floor laying
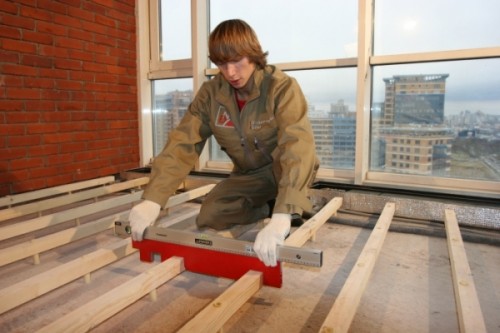
The most popular foundation for the wooden floor is the lag system. Among the advantages is the possibility of masking communication networks under the sexes, the ability to hide the level differences. Before installing the lags leave in the room for several days so that the material adapts to the temperature. The order of further action looks like this:
1. Marking and laying Lag.
Initially lay out a pair of lag on the same plane, between which the threads are stretched. The remaining lamps are laid out with a level of 50-80 cm depending on the thickness of the boards. Voids are usually filled out or insulating.
2. Installation of Lag.
Height is adjustable using wedges from plywood. Wedges and lags to the base are fixed with self-draws or nails. If the laying of the wooden floor does with their own hands occurs on the concrete floor, dowels and anchors are used.
3. Installation of boards.
Panel sizes are chosen based on the following considerations:
- each joint should be located at right angles relative to the edge of the panel, accurately in the middle of the lags;
- the first row of panels on lags are fixed on the stretched line, leaving a 1.5-centimeter clearance from the wall;
- panels are fixed to each lag. Holes for self-tapping screws, it is advisable to drill in advance;
- the gaps between the wall and panels are masked by sex plinths.
Recommendations of specialists
To properly put the boards and avoid popular errors, strictly hold the wood laying technology:
- Coloring panels are trying on the bars to designate markup. The flooring is made in such a way that the age-old rings of trees were directed in different directions.
- The process of fitting is replaced by the designation of each board. This will allow you to assemble the floor as a designer, once again not customizing the panel for the required size.
- Laying starts from a wall with a slight gap for ventilation. The gap will subsequently be disguised as a plinth. Nails drive at an angle so that the hats come into wood deeper.
- After installing the first panel on a width of 6 cm from the edge in the bars, you need to drive a few brackets, leaving the gap. In these cracks, a thin safety rail is installed. After between this rail and the brackets are driven by a wedge width more gap. Thus, the edges of the panels are tightly pressed to each other, which levels the formation of the slots.
- Then the boards are traditionally nailed with nails. At this stage, the brackets lose their relevance. Repeated operation occurs. Rest of a pair of panels again, pressed through a wedge and rail, attach to Brus. Fixation of wood is performed using nails and a displacement. Moreover, each next panel is compacted by the image, after which it is attached to nails. As experts say, if the tongs are turned illiterately, the laying density is significantly difficult.
- Sometimes directly at the wall ends of the panels are peeled, so that the bottom has become shorter than the top. Montage of extreme boards arise difficulties. To solve the problem there is a planer, with which the installation of the last board is largely facilitated. After the panel is sized and tipped with nails closer to the edge. It is recommended to use nails with a secret hat so that the appearance of the floors did not scare you. Plinth creates all the shortcomings left after installation.
- The joints of the joints are aligned with the grinding machine. At the stage of laying in the event of drops in the field of joints, it is possible to put under the lags of chunks of dense cardboard, rubberoid or toli. Slobs can not be applied. This option is short-lived.
- Finally, the slots between the walls and the flooring are masked by plinths, the installation of which is advisable to perform at the end of the finish.
- After that, you can install on the floor laminate, parquet, parquet board, flatten linoleum, etc.
- Surface treatment. Wood has two vulnerable sides - humidity and insects. From them will help to get rid of the primary processing of wood by chemicals or paints.





 Start a discussion ...