Most often on the current construction tradition, the slab overlap is aligned only on the one hand, so that the ceiling of the lower apartment is even and neat. But the party that will be the floor of the top apartment leaves much to be desired: bugs, pits, sticking fittings. Sometimes the flooring drop can reach ten or more centimeters! That is why, before proceeding to flooring, it is necessary to align the slab slab. And the cement band screed will help. Thanks to this work, you will get an even base on which any coverage will look great. The cost of a cement band screed depends on which construction team you hire. Is it possible to do this work yourself? Of course, how to make a cement tie of the floor will not be a lot of work.
What will take for work
Cement screed floor with their own hands is not at all difficult. Even a beginner builder will cope with such work. First of all, you need to purchase the tools that you will need. Include their price in the cost of the work of the cement tie.
- Thin level. It can be replaced with a long ruler, but only if it is really impossible to get the level.
- Hydraulic. This tool is not cheap, so you can make it easily. To do this, you will need two plastic bottles - 0.5 liters and a flexible hose. The device should work on the principle of communicating vessels - the liquid using the hose in bottles should be on the same level. Of course, this is a primitive tool, but it can also be used in construction.
- Knife.
- Roulette.
- Putty knife.
- Master OK.
- Roller It is not needed not only to apply primer, but also for waterproofing.
- Drill and nozzle for making a solution.
- The container in which you will prepare a solution (at least 30 liters).

How to prepare the surface
If you are still in doubt, hire specialist construction workers for the center of the floor or not, it is necessary to still find out how much the cement bandage band is. Some stages of work can be carried out on their own. It should be borne in mind that the cost of work may also depend on whether the surface of the screed is prepared or not, because many builders take the hourly payment. It is possible to prepare the surface with yourself.
- Clear the surface so that there are no dust and dirt on it, as well as the old coating. This can be done both manually and with the help of a vacuum cleaner - of course, construction.
- With the help of a cement solution, take cracks or holes that are in the floor.
- In the place where the wall is connected to the floor, it is necessary to put the damper tape - it will save from the flow to the neighbors of the solution, as well as the appearance of cracks on the tie, when it is ready. The damper tape should be higher than the level of the screed at least 3-5 centimeters.
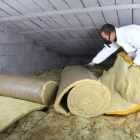
- Before laying a screed, it is necessary to carry out waterproofing of the floor. This will help special composition. This can be as insulation (penetrating, bituminous or alkyd) and ordinary dense polyethylene. Remember, if you have chosen a second option, then polyethylene must be laid on the floor with a solid piece or several pieces, but so that they overlap each other by at least 2-3 centimeters.

How to set the level
It is very important to properly set the level - it depends on it, even you will have the floor or not. In order to set the level, it is necessary to find the highest point - it will also help determine the thickness of the screed and expose lighthouses. From what thickness will be a cement screed of the floor, the choice and consumption of the material depends, the price of the cement screed of the floor also depends on this.
- In the room where it is necessary to carry out work, you need to carry out the base level - around the perimeter. This should be one parallel floor line.
- The initial mark should be a height of at least a meter from the slab overlap.
- After the initial line is ready, it will be necessary to pave a line throughout the perimeter of the room using a level line, laser level or hydraulic level.
- The fact that you end up will be - this is nothing but a basic level.
- Now all works are performed based on the base level. Thanks to this line, you can determine the highest point of the coating.
- After the floor is laid the height of the floor from the floor, it is necessary to measure the distance from it to the floor and put points. Somewhere the distance will be equal to 100 centimeters, somewhere - 95 centimeters, and somewhere less.
- The highest point is where the minimum distance from the base level to the floor.
- You need to connect all the points near the floor of the line - it will be a zero level.
- To determine the highest point in the room, you need to stretch the thread at the level of zero level and go with it from one wall to another.
- In the event that the highest point will be found in the center, then it is already necessary to postpone the new zero level.
- The new zero level should be three centimeters higher than the highest point in the room.
- The thickness of the cement screed throughout the room should be the same - three centimeters.

How to install lighthouses
The cement screed tie device is regardless of what the price of the work is necessarily executed in compliance with all the necessary rules. Otherwise, the result will not be exactly the one that is expected.
It is necessary to install beacons before the fill of the cement mortar - these are special guides, thanks to which the screed is aligned. Lighthouses are set strictly to zero.
- Lighthouses are made from specially made guides that are created for this type of work - they have a "T-shaped" form.
- Lighthouses can also be made from the profile, which has a "P-shaped" form.
- One should never make beacons from the tree - they will take themselves the water when the screed will dry, which will give cracks and destruction.
- All lighthouses in the room must be strictly parallel to each other.
- The most extreme lighthouses must be installed at a distance of 20 centimeters from the walls.
- The distance between the beacons must necessarily be centimeters by 30 or 40 less than the length of the rule.
- First, it is necessary to put a handful of cement, and then put the guides.
- From above to guides, it is necessary to set the level so that in all directions the floor was smooth and neat.
- Profiles can be displayed in terms of the level and with the help of self-samples - just before drill holes and insert corks into the overlap.
- If you still prefer cement fixation of beacons, make sure that the solution will freeze before work.

How to prepare a solution
To prepare a high-quality solution, you can take a ready-made mixture (good, such today is sold in any construction supermarket) or make it yourself.
If you decide to prepare a mixture yourself, you need to take one part of the cement and three parts of the building sand. The mixture is prepared as follows.
- Sand mix with cement with a trowel.
- In the prepared container pour water.
- Parts to enter a dry mix into water (not vice versa!).
- It is more convenient to interfere with a solution in deep containers, which has a volume of at least 30 liters.
- Saving the solution is best of all a drill with a specially nozzle - a stirrer.
- The perfect consistency solution resembles a thick sour cream.
- If you take a little mixture into a fist, it should not be spread or disintegrated.
- If there is an opportunity, it is desirable to add a plasticizer to the solution - due to this you can reduce the likelihood of cracks, and the solution itself will become better, it will improve plasticity and elasticity.

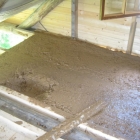
How to pour a solution
The solution is laid out from the corner opposite to the output. First, the solution is laid out between the lighthouses by 50 centimeters, but then with the help of the rule you need to pull it on the guides to yourself.

How long to withstand the screed
How much does the cement screed of the floor? On average, this procedure takes about three weeks. Do not forget that the screed will dry, so its surface will necessarily be able to moisten the roller. You can also cover the screed on top of the film - it will save from the rapid drying of the surface. Thanks to this, the screed is faster to grab, and there will be no cracks on it.
Remember that the screed is afraid of drafts!

Completion of work
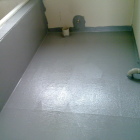
In the event that some flexible coatings are stacked on top of the screed - like carpet or linoleum, then the finish screed will be needed.
The finishing screed is a kind of bulk sex, it is necessary to perform it as follows.
- Exactly primed cement screed.
- Divide the self-leveling mixture (like "Knauf", "Ilsil", "prospectors", "Bergauf", etc.).
- Pour the mixture to the floor.
- If it is necessary - the surface must be dissolved with a roller or a spatula.

This mixture, like a screed, is afraid of drafts.
After a day, on this floor, you can walk.