Spring for the apiary - an important season. At this time, the bees begin to make cleaning rooms, actively work and raise the young. A prerequisite for their comfortable existence, especially during this period, is the presence of clean and sufficiently warm water in the hives. With the arrival of the first heat, it is time to take care of the equipment of the hives with comfortable drips. In this article we will tell you how to make drinking for bees with your own hands, while saving a certain amount of money.
There are quite a lot of options for this design: from the simplest devices to individual heated drinks. Below we give a few examples of how you can create this design.
Intracelete drivingker for bees
What you need
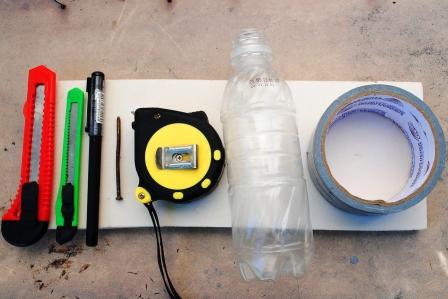
You can buy drinking for bees in any specialized store, but it will make it yourself much cheaper, and more pleasant. In order to make it make it, you will need certain materials and tools, which will not be difficult:
- empty plastic bottle of up to 500 ml;
- stationery knife;
- small nail;
- a piece of foam 2 cm thick;
- wide scotch;
- a pen;
- ruler.
To begin with, I would like to give a pair of recommendations:
- Do not use for construction too voluminous bottles. First, their contents are heated in the sun much longer, and the bees are not recommended to use cold water. Secondly, the pressure of the liquid from the large capacity will be stronger, which will lead to it over the edge of the edge.
- Instead of a transparent stationery scotch, give preference to the gray scotch "moment" - its structure is slightly denser, and the glue has stronger fastening properties.
Mastery shell
Consider the phased process of manufacturing the drinker for bees:
- From a piece of foam, cut out a fragment of approximately 7x12 sizes. You can define an area yourself based on the individual features of the hive.

- The resulting part is the handle into two parts: measure 5-6 cm from the edge and swipe the transverse line. From a smaller side, approximately 1 cm from the edge, draw a point or dash.

- The thickness of the foam part is divided in half with the handle. In our case, every half will be 1 cm, but in general this indicator should be determined by the height of the flyer - the design should be the most tight in it.
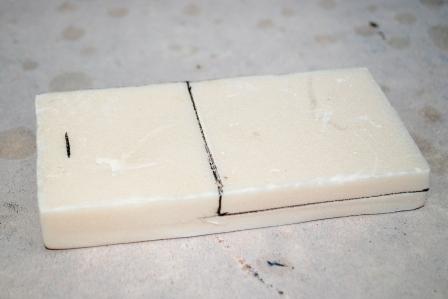
- From the edge where you put a mark, attach a bottle of neck and push as stronger as possible. Then screw the bottle into the foam on the entire height of the thread of the neck. As a result, you will have a carving inside the polystyrene foam construction, suitable for this container. These two parts of the drinking box are combined with each other quite firmly, and in the inverted state, the fragment of the foam can withstand the weight of the total one-liter tank.

- The next step must be divided by the marked thickness of the second part of the fragment in two. Take the stationery knife and reserve the structure until the middle of the thickness, and then cut the layer of the material along the drawn horizontal line.

- After that, you should draw the handle of the contours of the future water gutter. The shape of it can be completely any. The size of the gutter does not play a special role, it is worth taking only its maximum overall width. This indicator can be calculated by reducing 1 cm on the size of the tape. For example, if the tape is 6 cm in your width, then the chute should not exceed 5 cm. Having draw the contour, cut through it through a stationery knife.

- Circle drilled by a bottle neck, divide along half. That part that is located closer to the groove, cut under the tilt.
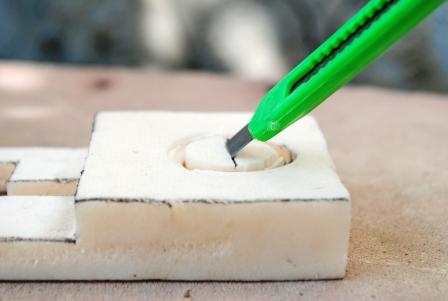
- At the base of the gutter, make a place for the opening through which the water will be fed into the drinking. Put the nail and rotating movements drill the hole through. If the liquid will be used in the finished drink for bees, the liquid will flow under too weak pressure, it is possible to slightly increase this dolnation with a larger diameter.
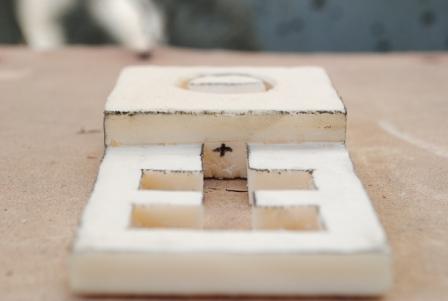
- The next stage must be made in the bottom of the bottom. To do this, take the tight tape and proof the opposite side of the structure along the entire length. Note that the chute must be completely closed.

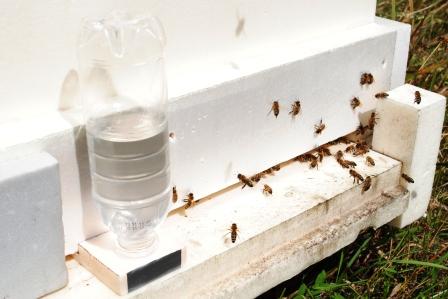
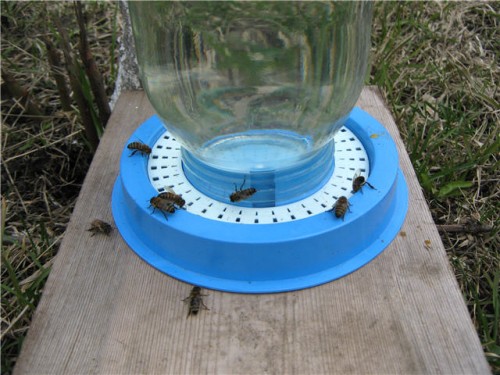
- Our design is fully assembled, it remains only to launch it in business. Pour clean water into the bottle, put it on the table and screw the foam part on top. Turn the capacitance upside down and the drinking bowl is ready to work: a life-giving moisture comes through the hole in the chute.
Several useful tips
Some recommendations for the use of drinkers:
- Immediately after the design is ready, the bottom of the gutter will be quite sticky, so it is not recommended to put such a drink in the hive on the first day. First, pour water into it and let it stand for about a day. During this time, the glue will lose its bonding properties, so that the design can be used without fearing that the bees stick to the bottom of the groove.
- If you want the water to warm up under sunlight in a short time, color the container in black. You can immediately use a dark bottle instead of transparent.
- In some cases, a fragment of a rope that serves as a phytyl is inserted into the water duct hole. Through it, the moisture enters the drink a little slower.
- Another advice: do not use a similar design as a feeder. This drinking hotel is located very close to the flyer and if food will be located - this will attract other insects who want to feed. In this case, your bees will be occupied only to the fact that they will drive off the uninvited guests, and this will affect the productivity of their work.
Homemade Drinking Crane
For a fairly large apiary, in which there are at least 10 bees, a large bulk design is suitable. Make a similar drinking for bees with your own hands will not be difficult:
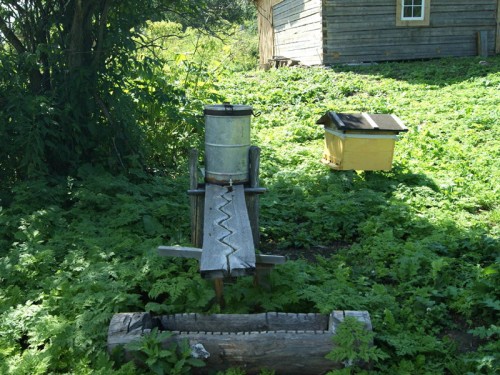
- Take a suitable tank with a crane. It can be a metallic barrel, a handicraft or an unnecessary samovar.
- Install the container on the elevation, and place a wide board below the tilt.
- On the board, we ride a zigzag empty, or bring the wooden planks in the same way.
- In the barrel, type clean water and open the faucet exactly so much so that the liquid is gradually dripped into the drinking canal.
- Remember that the board with which the insects drink must be kept clean - this will help avoid various diseases caused by antisanitation. Therefore, in order to protect the design from dust, garbage, excrement and other things, build a small canopy from polyethylene above the drinking one.
So that the bees are used to consulating water from the drier, they can be attracted by sprinkling the board with a small amount of sugar. And in case of needing in water tanks, vitamins, certain drugs or useful minerals can be dissolved.
Drinking bowl for bees, video:


 Start a discussion ...