Ceramic tile is one of the most ancient roofing materials. Its use in the construction of buildings began in ancient Egyptian times more than 4 thousand years ago. Since then, natural tile remains the leader among the materials for the roof of the houses. More than half of private buildings in Europe are covered with its help.
Content
Ceramic roof - advantages and disadvantages
In the roof of natural tiles there are a large number of advantages over metal, soft or slate:
- The most important advantage is its environmental friendliness. The process of manufacturing the tile does not provide for the presence of adversity and materials harmful to humans. It makes it, like many centuries ago, with the help of clay firing, therefore, with drops of temperature, high humidity, it does not highlight any vapors and unpleasant odors, which often happens to the roof from bituminous tiles.
- Another unconditional plus of the tiles is its energy efficiency. Due to its unique structure, such material perfectly retains heat. In its condition, it favorably affects the presence of an air layer between a wooden structure and roofing flooring. Such a roof has waterproof properties. The burned clay does not pass the moisture inside of its structure, and the groove system reliably delays water on the surface without letting it get inside.
- Coating strength. Tile - Pretty durable material capable of withstanding high loads. Therefore, in winter, such a roof withstands the thick layer of snow without any problems. When using a ceramic roof, the risk of damage to the structure from lightning is reduced, in comparison with the use of metal tile or profiled sheet.
True, it is worth noting that this technology has a roofing of the tiles and a significant drawback - the complexity and high cost of the material itself and its installation. However, this lack of interest is compensated by the above advantages. Installing tiles requires the presence of a reliable roof base, since this material has the greatest weight. In addition, it is possible to mount it only if the construction has powerful walls and foundation capable of withstanding the dimensions of such a roof.
It is necessary to take into account that in comparison with the soft tiles roof, which does not require such accuracy in the roof design, the installation of ceramic tiles is further dependent on the accuracy of the design elements. Unlike the same roof from the flexible tile, an unprepared person is unlikely to be able to fulfill the entire complex of work, ranging from the selection of materials and ending it with installation. Therefore, if it is planned to make a roof yourself, it is possible to choose less complex work as possible, such as a soft tiles, professional flooring or slate.
Tile Stacking Preparation
Before starting the installation of the roof of the tiles, careful preparatory work must be carried out. They are in the calculation of parts of the roof design, elements of the crate under the tiles and the number of roofing material. It is also necessary to clearly understand the number of good materials and fasteners necessary for the production of work. Depending on whether additional hydro and thermal insulation will be used, the amount of component elements should be made.
Calculation of the number of tiles
Calculation of the number of tiles. To do this, it is necessary to understand what a useful and complete long tile.
Full length differs from the useful magnitude of the adhesion (overlap), with which the tile is mounted. The amount of the allen depends on the angle of inclination of the roof. Than he is less, the more there should be a naughty. If the roof of the roof of the tile is up to 25⁰, then the magnitude of the overlap must reach at least 100 mm, for an angle to 35 ° - 75 mm, for an angle more than 35⁰ - 45 mm. Knowing the length of each tile, it is possible to calculate its useful length, and respectively the number of rows. After examining the instructions for the material in which its width is indicated, you can calculate the number of pieces on all the roof. To this figure, we boldly add 10% on battle, trimming, and add good items to arrange the frontones and the skate.
Calculation of roof design
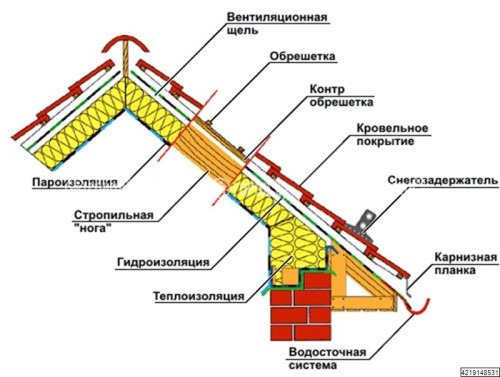
Calculation of roof design. It is necessary to take into account the fact that the tile has a rather large weight, so the roof design should be reinforced. The 55mm x 150mm bar is considered optimal for arranging the rafter, which is mounted in a pitch of 600 mm. Such a design with a reserve will endure not only the dimensions of the tiles, but also the weight of snowing snow. If the cross section of the bar has a large area, the distance between the rafters can be increased.
For mounting, the crates perfectly fit the timing of 50 mm x 50 mm. The number of rows depends on the calculated number of roofing rows plus one row, which will pass along the cornese sweep. The last pole of the crate, which is located along the eaves, should be 15-20 mm wider than the rest of the ride. It is necessary to align the row of tiles. For mounting, the crate makes markup on the legs of the rafter. The placement step of the poles of the crate depends on the angle of inclination of the roof. For markup uses a chalk construction lace. Knowing the number of stories and their length, you can calculate the number of timber for the crate. It should be remembered that it is the installation of the crates that plays a key role in the correctness of the stakeholder.
Calculation of waterproofing
Calculation of waterproofing. When mounting the tiles to the roof with a slope of less than 22⁰, it is necessarily placed by a layer of waterproofing. As a rule, the membrane material is used for such purposes. It can be rubberoid, a ruble, etc.
Such a material with an adhesive minimum is 100 mm, bottom-up. Near the eaves and frontones leave at least 150-200 mm of the allen. The required amount of waterproofing material is calculated by multiplying the roof area on the coefficient of 1.4. Fixed waterproofing to rafters with a construction stapleron or nails with a wide hat.
Better after the end of the fastener additionally consolidate it with the help of a presses on each rafter foot. Under each support, a waterproof gasket is installed on each support. The joints of the waterproofing material are glued with the help of a special assembly tape.
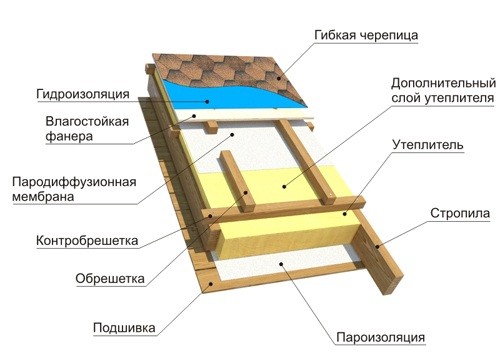
When laying such a material, it is necessary to provide a gap between roofing material, thermal insulation and waterproofing. Otherwise, moisture will accumulate in these layers, which will inevitably produce their destruction. The gaps are equipped due to the installation of crates and counterclaims.
Installation of ceramic elements
For installation work, a large number of fasteners are needed. Most of all will be required special galvanized screws and kleimers. The elements of ceramic overlap are attached to increase the reliability of the roof from wind loads. In mandatory, the first row is fulfilled along the eaves, the last row along the skate and side rows along the frontones. If the roofs of the roof have an angle of inclination more than 50 ⁰, then it is necessary to mount the edge elements, while fasteners are performed in a checker order.
Further work order:
- Before starting work, all metal tile is immediately raised into the working area. This will reduce the load on the rafter due to the reduction of movement by design. At the same time, it is important to decompose the entire material into small packs along the entire roof surface. If we put all the tiles in one place, you can destroy the design of the overlap. As a rule, 5-6 pcs are laid in one pack.
- Before installation, it is necessary to learn one rule: the tile is always attached, starting from the lower right corner. It is very important. First of all, two main rows are laid: the lower row near the eaves and the upper ski row. In this case, the tile is not fixed. If the length of the row does not allow to put in it whole pieces of tiles, then they are pruning them on Earth with the help of a grinder and grinding circle. It is worth noting that the tile is very easy.
- After laying the first and last row, placing the boundaries of horizontal series. We do it with the help of a color shoelace. Tags apply every three rows.
- Once the tiles laid out, we start to fix it. The ceramic coating is fixed only in the way as indicated in the manufacturer instructions. As we have noted, it is necessary to start from the bottom right corner.
- The next step is to install dobornyh parts ridge and gables. Prior to installation of the gable parts, the ends of the battens fin set Edged board. An important rule: Gabled board must not come into contact with the ridge tiles. After the end of its mounting set shaped gable tiles.
- The final touch is to install a roof ridge details and filing the eaves. The last elements are cut with a grinding wheel shaped gable tiles. Eaves filed edged boards so as to ensure free air circulation.
In the production of works on installation of ceramic tile floors of the need to clearly elaborate production work plan and follow it. It is best to make structural drawings, based on the calculated size. It is not allowed to change the drawing size in the course of the work.
Be sure to consider the activities of work safety. Working at height requires pridelnyh attention, as well as the availability of personal protective equipment such as helmet, belt and mounting points.
Naturally, the device of the roof tiles - the process is quite complex and must be performed by professional workers, as it requires special knowledge and skills. Before installing the best found online photo roofing shingles or her video installation, to more clearly guided in the wisdom of the process.





 Start a discussion ...