A homemade wind generator is an excellent opportunity to provide your home or workplace in fact free electricity. Without environmental pollution and health threats. There are many instructions how to make a wind generator for home. We offer one of the simplest and accessible to everyone consisting of five steps.
Tools and materials
Instruments:
- hacksaw or ribbon saw;
- lobzik;
- lathe;
- hand drill;
- drill;
- screwdriver;
- 2 clamps.
Details and materials:
- engine;
- battery;
- wires;
- pVC pipe;
- waterproof wood;
- kink;
- bolts and washers;
- aluminum disk;
- pulley fastening shaft engine;
- paint, primer;
- nylon rope or metal cable.
Select generator
The first and main step is the choice of constituent elements of the whole design. Today, very many for the purpose of saving funds are trying to assemble the windmills on their own. The first attempts sometimes turn out to be unsuccessful and work seems very difficult. In fact, everything is much easier than it seems.
Start searching for a suitable engine. Some are trying to use computer engines with a ribbon drive. But it is extremely difficult to find them in our time, so it is better to refuse this option. But if you have at home or familiar is there, there is no reason to abandon its use. Ametek engines have proven well in this regard. One of the best - by 99 volts of DC. It copes perfectly with the tasks of a small power plant. But it is almost impossible to find it today. Although you can search on the Internet auctions.
Do not dwell on the search for a specific model. The wind generator diagram implies the ability to use other, more accessible options. But the point is also that most of these models are not designed for heavy loads when quickly promotion. Therefore, if possible, choose those that are designed for high voltage at low revs.
You need an engine that will be able to remove 12 volts without any problems even with low turns on weak wind. The engine that is designed for 325 revolutions will be able to give more than 12 volts. And consider that we have a low speed.
Do not chase significantly more powerful engines. The fact is that much better result you will most likely not get, and they spend more money more. An ordinary Ametek 30 Volt engine can be found on the Internet less than 30 dollars. Do not waste more than need.
Such a generator even from a small push hand is able to brightly light the incandescent lamp. To find out how long he can withstand, you can attach it to a drilling machine and check how it will cope.
When the generator acquired and its performance is verified, you can begin work on the blades.
Windover blades
Many craftsmen cut the blades of wood. This is a pretty good option due to the ease and strength of the material. However, the cutting process itself requires skills and significant energy consumption. Therefore, we recommend using plastic.
There are certain requirements and installation features:
- The size of the blades must be exactly calculated. Their diameter ideally is 0.2 the lengths of the blade itself. That is, if you have a blade each 0.5 m, then the width will be not more than 10 centimeters.
- To make 4 blades you need a plastic tube of the desired length and diameter (standard - 60 cm of length and 15 cm in diameter). From it, you can cut 4 identical blades.
- Cut the pipe along the four equal parts. After that, on each blade at the base, cut the square 5x5 cm. Here elements will be attached to the base.
Advice! Before cutting the square, we advise you to drill a small hole in its corner. Thus, you will not cut anything superfluous and significantly simplify your work.
- Now on one of the blades, smoothly diagonally cut off the pipes excessively with the pipe to provide better aerodynamics.
- The first blade will be a template for which the rest will occur. Please note that in most wind turbine schemers are used three blades. But do not rush to throw out an extra piece of the pipe. He may still need about the reserve.
- Corners and edges We advise how to polish on the machine and smooth out the essay. Although slightly, it will improve the aerodynamics of each blade. Yes, and they will look more attractive.
Installation of the wind generator
This work also needs to be done step by step.
- For the assembly of its own power plant, it is often not to look for additional materials and tools. You can use the usual pulley of the engine shaft mounting and a simple aluminum disk, which most likely have in your garage. The size of the disk must be 13-15 cm. But it is impossible to attach it to the shaft of the engine. Therefore, the available parts you need to connect together. To do this, it is enough to drill in the disk the holes of the desired diameter and fasten it together with the ready-made blades bolts to the pulley.
If you wish, you can buy a screw cover in the store so that your windmill is more aesthetically attractive, but this is an optional step.
Someone can advise you to install an additional meter, but we would not recommend this. Most of the meters partially break the circulation of air, which is why the speed of movement of the blades can decrease. Although insignificantly, but adjusted for long-term operation can be very tangible.
- Next you need to install the turbine. It can be mounted on a wooden stand length up to meter.
- To protect the engine from rain, you can cut a piece of the same plastic pipe. The main thing is that the diameter is at least 10 centimeters.
- At this stage, you also need to make the tail part. To do this, on your wooden bar perpendicular to install an aluminum sheet, sizes of approximately 25x35 cm. This is quite enough so that the windmill turns without problems behind the wind.
We want to emphasize that when you make a homemade wind generator, you will not need extremely accurate calculations.
Tower for installation
Now you have to prepare a tower for the finished windmill. The main requirement for it is the possibility of a windmill freely rotate over the wind.
- To create a simple and inexpensive tower, you will need a metal tube with a diameter of 25 mm. Through the pipe will be held all the wires, so the diameter should be enough.
- For the base of the tower, a disc from plywood with a diameter of 0.6 m is suitable. Of the 25-millimeter fittings, make a U-shaped assembly form, and install a tee in the center. Such a design is quite simple, but will allow you to raise and lower the tower without much effort.
- In order to fix the disk on Earth, drill holes in it for metal inserts.
- To make a vertical wind generator, you will also need a robust supporting tube that will connect the base and the windmill device. You can choose the length yourself, but the standard is 3-5 meters.
- All wooden parts of the design need to be covered with a dense layer of paint. It will be fine if you still have a closer surface before that. This will additionally protect the tree from rotting due to the impact of moisture.
- Most likely, you will also need to fasten to the tail of the windmill counterweight for additionally balancing the system.
To check how moving the blades, it is enough to get out with a windmill outside in a windy day and raise it over your head. If everything is done correctly, turnover will be large.
Installing the battery and electronic control system
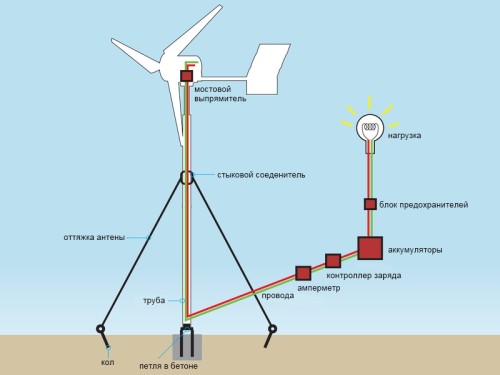
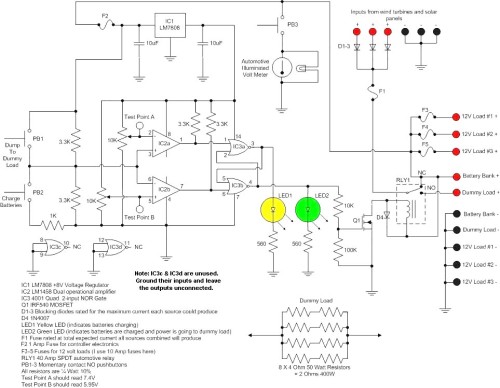
The electrical system is already the final part of the work. You need not only a turbine, but also several capacious batteries that will store the energy produced by the generator. In addition, we also recommend to mount the blocking diode. His task is to prevent the supply of excess energy, as well as to protect the engine from the same energy obtained.
To date, there is a large selection of controllers for wind power plants. Again, some of them can be found on the Internet for the minimum price. If you do not have experience in electronics, then this is the only possible option. It is impossible to understand independently with complex schemes.
We advise you to search for all the necessary materials before making the wind generator. Some details are difficult to find, and without them, you may have to change the entire design scheme or some of its elements.
Final assembly of the wind generator
Now that all elements are ready, you can move to the installation of your wind generator.
- First of all, we install a bought-bought pipe bought. It can be consolidated by wooden spikes and a nylon rope (it is immune to moisture and temperature drops). To keep the ropes better on the tower, we advise you to install metal brackets. Rope can be replaced with metal cables in the future.
- The wire through the pipe is easiest to stretch, having put it with a solid wire and capening inside.
- It is very important to firmly screw the plywood round of the ground to the ground. Very good, if you create a small pit and boost it with concrete, then scam in thick bolts. If there is no such possibility, you can drive deep into the ground the reinforcement and get the tops over the plywood. It will not be as securely, but for regions with moderate wind speed indicators is quite enough.
Now that all the elements you joined each other, study how high quality all the electronics are hidden. Moisture entering during the rain can cause a failure of the entire system and is hazard to your health. Therefore, all contacts need to thoroughly insulate and hide from accessing people and animals (if the windmill is installed near the private house or in the country.
That's all. Now you know how to make a wind generator with your own hands and become less dependent on the main sources of electricity. We offer for viewing video for the manufacture of the wind generator.





 Start a discussion ...